Archive for the ‘finished objects’ Category

h1

Cozy Mittens Knitted Flat

January 5, 2015

cozy-mittens

This has to be the craziest pattern for mittens I’ve ever seen – and the easiest. Mittens are almost always knitted in the round, on circular needles or DPNs, but these are knitted flat – and not a mirror image flat, like you would think and then just folded together.  When I first saw these, I couldn’t figure out how they were seamed up, so when I knitted them I took photos to show you how to fold them.

mitten-laid-flat

mitten-knitted-flat

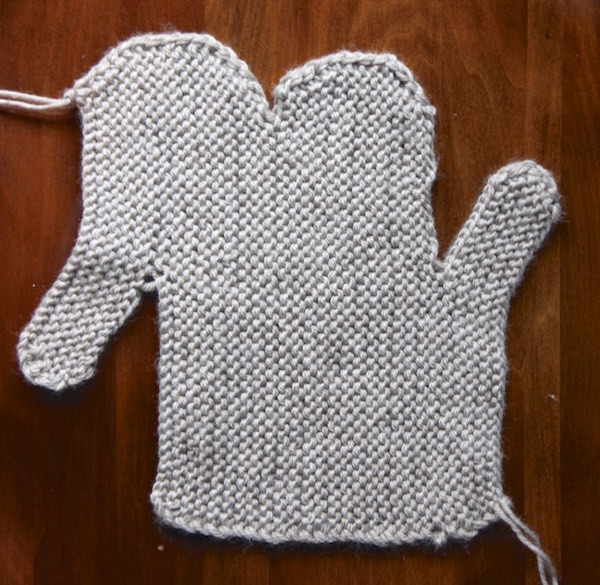
The pattern calls for  these mittens to be knitted with worsted weight yarn.  When I did a mitten the first time, they were way too thin and way too small.  So I experimented and knitted another mitten with the same worsted weight yarn, only held double and they were perfect!  As I was knitting the piece, it looked huge, but after it was seamed together, it was just right.  It makes a double thick, warm mitten this way and the cuff comes up a full 3.5 inches on my wrist.  They’re a nice size.

one-cozy-mitten

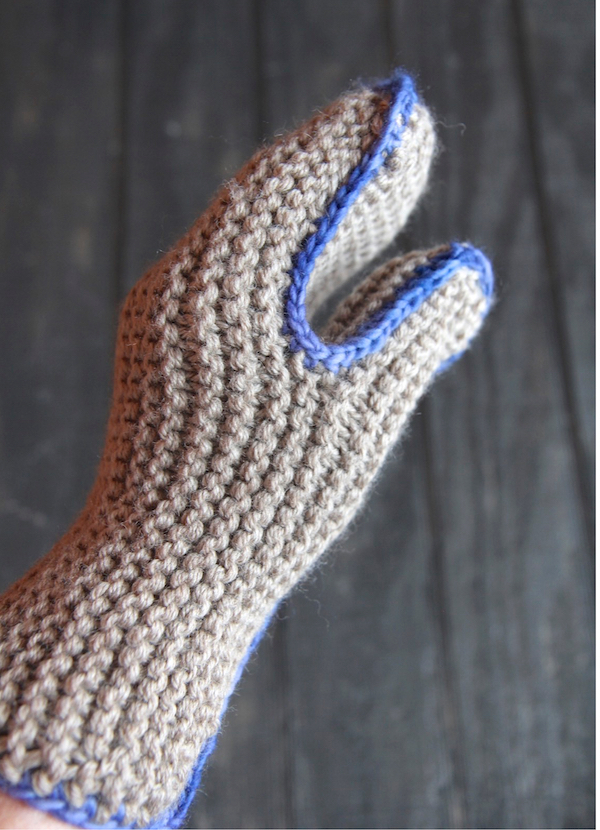
After you knit the flat piece, the mittens are folded up by seaming them together with a crochet hook, contrasting yarn and using single crochet. This was simple as could be – but a couple of tips for you: the pattern says to do it in two intervals, by crocheting across the top and down to the thumb and then cutting the yarn and then crocheting up the rest. I did mine in one pass – I started at the top and crocheted all the way to the bottom and then went around the cuff.  Also, the single crochet looks better on one side than the other – so be sure to begin it with the top of the mitten facing you.  You can see the sequence in these photos:

crocheting-around-mitten

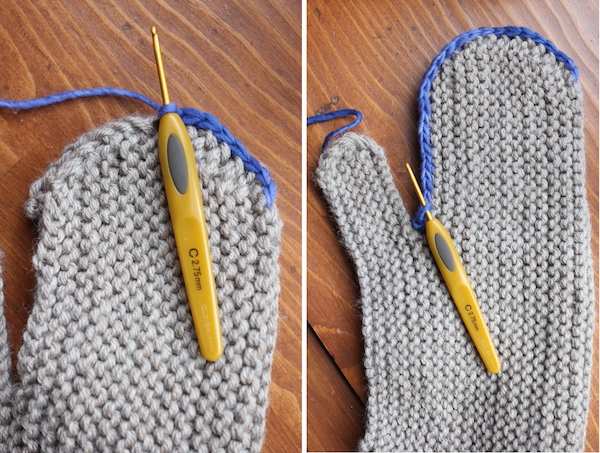
Fold the mitten together, aligning the top halves. Crochet the two halves together along the top. After you crochet down to the the thumb crotch (above), turn the whole piece over:

joining-thumb-with-crochet

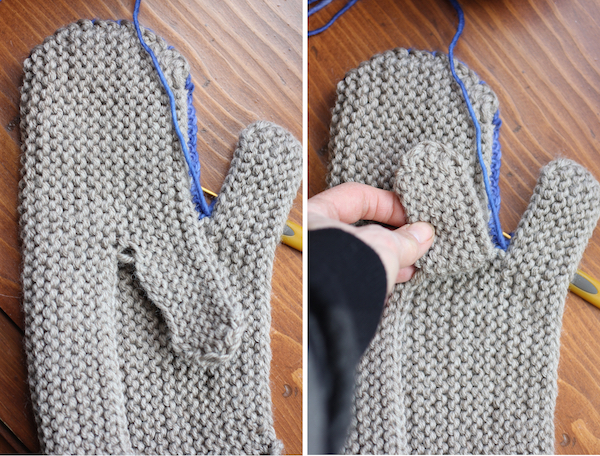
now flip up the thumb on the left (above), 

crocheting-thumb

then fold over the thumb on the right to match the thumb on the left and continue to single crochet them together (above)

crocheting-cuff

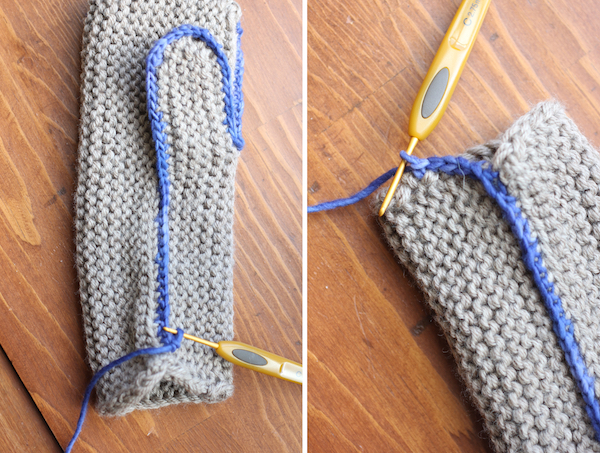
crochet down the thumb, the lower side seam and then just continue right around the cuff.

I hope these photos help you if you want to knit these.  These mittens knit up incredibly fast!  I loved this pattern.

NOTE:  This pattern is no longer available on the Martha Stewart website, where it originated.  However, here is a link to the pattern.

cozy-mittens-twoshot

Pattern: Cozy Mittens
Yarn: Cascade Yarns 220 Superwash Worsted, held double, Doeskin Heather
Malabrigo Merino in Indigo
Needle:  US #8, circular, Addi Lace
Ravelry Page

h1

Snow Buddy Family

December 3, 2014

snowbuddyfamily

I think one of the nicest yarn shops I have ever visited is the Yarn Garden in Charlotte, Michigan.  I was in there a couple of years ago and was so impressed with this shop.  I wish I had taken a picture of the interior. Old fashioned downtown shop with high ceilings, brick interior . . . just a really welcoming space with lots of quality yarns.  I loved this place.  And on one of the display shelves sat the cutest little knitted winter family of characters.  I immediately bought the pattern and finally got around to knitting a few of the little guys.

snowbuddymama snowbuddy

These tiny people are quick to knit up.  You stuff the bottoms with dried beans for weight and then add poly fill for the rest.  The pattern is easy for just about everything except the little baby’s earmuffs – I never did understand the directions for those and so I just improvised.  Other than that, there were no troubles with the pattern and I had so much fun knitting them.

snowbuddybaby snowbuddykid

This is a great pattern in which to use up scraps of yarn.  All the little accessories do not take up much yarn.  I knitted these in worsted weight yarns.

Pattern: Snow Buddy Family
Needle: US#3 & US#6
Yarn:  Various Stash Yarn (I used a lot of worsted)
Ravelry Page

h1

Turkish Bed Socks

September 8, 2014

IMG_6621

Here’s a fun little project I recently finished.  These little socks are super easy to make and make great use of all that sock yarn laying around. I guess a lot of people like to wear them with clogs, but I made mine just for something comfy to wear around the house.  The pattern is from Churchmouse Yarns and Teas shop on Bainbridge Island.  If you’re ever in the Seattle area, it’s a great little shop to visit. And they have a lot of terrific patterns on their website.


IMG_6247

IMG_6262 IMG_6280 IMG_6611


I made little tassels to go onto mine and I really like the look.  The yarn I used is from Pagewood Farm – it’s hand dyed, super soft 80% merino, 20% nylon. The color is Lavender Fields. I used #3 circular needles and this made a perfect size for my foot, which is an 8-1/2.  I loved the pattern because there was hardly any purling and I could just go round and round on my circulars using Magic Loop.  These knit up really fast and I’m definitely going to make another pair in a different color.

IMG_6637


Pattern: Turkish Bed Socks
Yarn:  Pagewood Farms Sock yarn in Lavender Fields
Needle: US 3 Addi Lace Circulars
Ravelry Page

h1

Crochet Squares Throw

January 21, 2014

IMG_3717

Well I finally got my grey crochet throw finished and I’ve written up the pattern for the square.  I had to teach myself crochet to do it, but I’m glad I did because I am a crochet fan now and have been crocheting lots of little other things, too:

IMG_3683

I crocheted 30 squares in all and then just crocheted them together, using a single crochet stitch.  I put a touch of purple and green here and there, but overall the color is gray which I love.

Untitledcrochet

I have gone over the pattern with a fine tooth comb so that it reads correctly.  Since I am a novice crocheter, I hope the pattern reads okay for you guys.  Let me know if there are any problems with it.

IMG_3743

The “Leaf” Row is probably the hardest row to get down but once you do it a few times I swear you don’t even need the pattern anymore for that row.  The “yarn overs” in that row are very fun to do, I think.  And it zips right along.

IMG_3704 (1)

The yarn I used produced the specific drape that I wanted in this throw.  For the first time, I didn’t use wool and it was very different.  The cotton was stiffer to work with but created a more defined stitch than most wools would.  It was a beautiful yarn from Cascade – Ultra Pima. The main color was the Taupe – go to my Ravelry page to see details.

crochetsquaresone

crochetsquarestwo

ELAINE’S CROCHET SQUARE:

for a printable version of this pattern click here

each square is 9 rows

(stars are repeats)

ch 5, join into ring or do Magic Ring

Row 1: Chain 2 (counts as 1 partial dc), 1 partial dc, yo and through the 2 loops, ch1. *Work 2 partial dc & then yo and through all 3 loops, ch1* 7 more times.   8 clusters total.

Row 2:  sl st to 2nd chain,  ch 1.   *1sc, 3 dc, 1 sc  in next chain loop space*.  Repeat in each ch loop around.  8 total.

Row 3:  sl st between two petals, ch 1, 1 sc in center of petal, ch 5.   *1 sc in center of next petal, ch 5.*  Repeat. 8 total. sl st to beginning ch 1.

Row 4:  * 1 sc, 5 dc, 1 sc  in the ch5  loop space *   repeat in each ch5 loop space around – 8 total.  Sl st at the beginning of the next petal

Row 5: (leaf row):  ch 1 (=1 hdc)  *ch 4, 1 sc in center of petal, ch 3.

Make  Leaf: yo twice, hook into last sc of petal, yo = 4 loops on hook.
yo and through 2 loops 2 times – 2 loops remain.
yo twice and insert hook into same sc of the petal work, yo = 5 loops on hook
yo and through 2 loops 2 times  = 3 loops remain
yo twice and insert hook into first sc of next petal, yo = 6 loops on hook.
yo and through 2 loops 2 times = 4 loops remain
yo twice and insert hook into same sc, yo = 7 loops on hook
yo and through 2 loops 2 times = 5 loops on hook
yo and through all 5 loops, (this completes 1 leaf)

ch 4,1 sc in center of dc of next petal, ch 4, 1 hdc between next 2 petals

Repeat from * 3 more times

ch 4, ending last repeat with sl st to 2nd ch at beg in rnd instead of 1 hdc.

Row 6: ch 3 (counts as 1 dc),   *4 dc in the ch 4 loop, 1 dc in the hdc.
make corner:  3 dc, , 2 tr, ch 4, 2 tr, 3 dc, 1 dc in the hdc*  repeat all the way around, ending with a 4dc and a sl st to 2nd ch at beg of round

Row 7:  ch 3 (counts as 1dc), dc in each stitch all the way around. When you come to a corner: 3 dc, ch2, 3 dc in the ch 4 space makes a corner.

sl st to 2nd ch at beg of round

Row 8:  (skip space row) ch 4 (counts as a dc) ,* sk next dc, dc in next dc, ch1  all the way across. Make  corner:  2 dc, ch 2, 2 dc in corner ch 2 space.    Repeat all the way around.

sl st to 2nd ch at beg of round

Row 9:  ch 3 (counts as 1 dc), dc in every ch 1 sp and every dc across.  Corner:  2 dc, ch 2, 2 dc

I made 30 squares and crocheted them together, just using single crochet.

For the edging, I did a series of 9 stitches all the way across, making little arches, working one stitch in every stitch on the throw:  1 sc, 2 dc, 1 tr, 2 dc, 1 sc, 2 ss.   I just repeated that little arch all the way around.

IMG_3693

adding the edging

IMG_3739

IMG_3746

Here is the same square crocheted up in some fine linen thread that I’ve been experimenting with on a tiny crochet hook – so fun!

Crochet Squares Throw
Hook:  3.5  mm (E)
Yarn:  Cascade Ultra Pima
Ravelry Page