Archive for the ‘magic loop’ Category

h1

Shawl Baby Sweater and Garter Ear Flap Hat

November 14, 2016

garter-ear-flap-hat-shawl-sweater

I had to interrupt my Capella shawl knitting for something really important – a baby gift for a little boy!  I knitted a little shawl sweater and a little hat with ear flaps. These were two new patterns that I had never knitted before and I thoroughly enjoyed both of them and can highly recommend them.  And an added bonus:  they are both free patterns!

shawl-sweater-detail

The baby sweater is a pattern called Baby Sophisticate by Linden Heflin. I especially loved the construction of this sweater because there are no seams to sew up!  You knit in the round (my favorite) for the yoke, place stitches for the sleeves on holders, knit the body, bind off and then just place the sleeve stitches on your needles and knit those in the round.  You then pick up stitches for the shawl collar and button placket.   I knitted this sweater using my favorite Magic Loop method on circular methods.  You can find a tutorial for it here.

The pattern page is here but if you would like to see some of the more than 8,000 sweaters that people on Ravelry have knitted from this pattern, you can see them here.  I like to check out a project’s Ravelry page before I begin a project, so I can see how other people knitted the pattern, check out different color options and read notes and tips that people write about that pattern.  If you are not a member of Ravelry, join now!  It’s free, too.

The buttonholes were easy to do – just one YO and that’s it.

For the yarn, I inexplicably used an acrylic yarn.  It was an impulse buy.  I never buy acrylic yarn, but the colorway just jumped out at me.  I used Vanna’s Choice Lions Brand yarn in Grey Marble.  After I blocked the sweater, the yarn softened up a little.  But I didn’t like knitting with it much – it doesn’t have any give, like wool.

Pattern:  Baby Sophisticate Shawl Collar Sweater
Yarn:  Vanna’s Choice Lions Brand Acrylic in Grey marble
Needles:  size #9 Addi Lace circular needles
Ravelry Page

_________________________________________________________________

THE HAT:

garter-ear-flap-hat

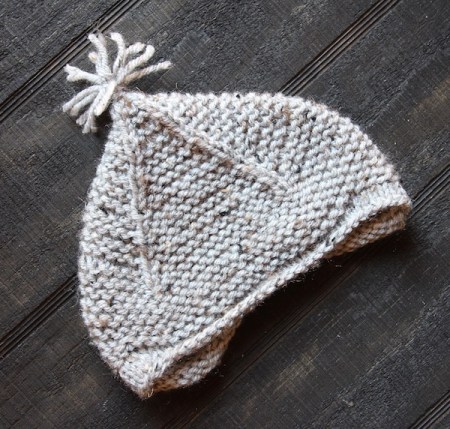
The little hat is so adorable – it’s a pattern called Garter Ear Flap Hat from Purl Soho.  If you don’t know about Purl Soho, it’s a wonderful yarn shop in New York City.  They have a fabulous web site.  If you have never been on it, you will be amazed at the projects, tutorials, tips, patterns and ideas.  And so many of the  patterns are free!

garter-ear-flap-hat-tassel

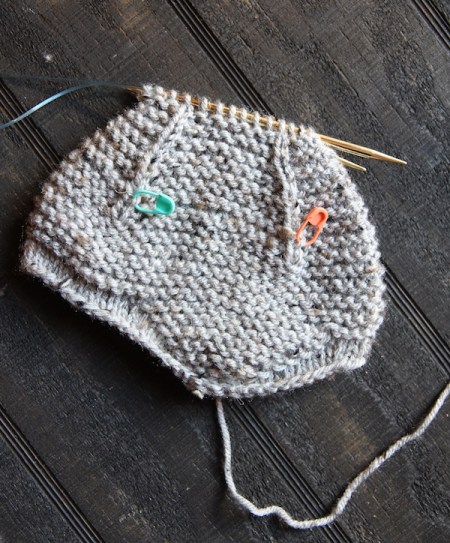
I love the hat because the design is just a little different – a little whimsical.  It’s a very easy, fast pattern.  After casting on, you knit the two ear flaps in the round, using short rows, which I love to do.  Then you continue on knitting the hat, shaping the crown in garter stitch.  Easy peasy!  I used my beloved Magic Loop method on circular needles.

garter-ear-flap-hat-3

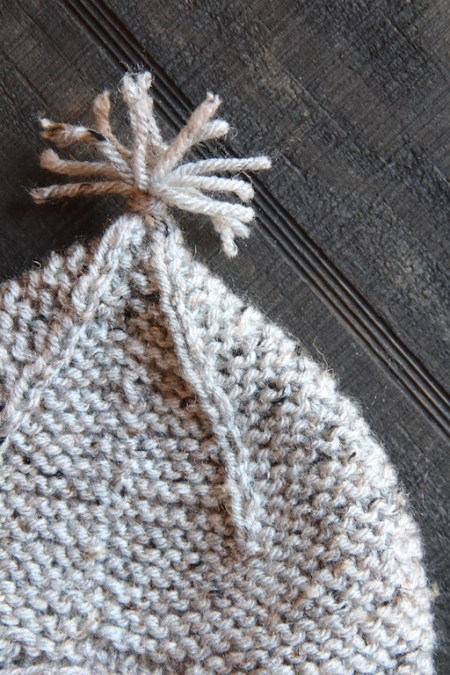
I love the cute little tassel on the top – how sweet is that?  Only takes a minute to make it. If you’d like to check out all the different versions of this little hat on Ravelry, the page is here. 

garter-ear-flap-hat-detail

Pattern:  Garter Ear Flap Hat from Purl Soho
Yarn:  Vanna’s Choice Lions Brand acrylic in Marbled Grey
Needles:  #8 circular Addi Lace
Size:  I made the small size, but on #8 needles
Ravelry Page

Advertisement
h1

Magic Loop Tutorial

January 23, 2016

paperdoll gloves magic loop

I have had several requests lately for help in using the Magic Loop method for knitting in the round.  It can be a little daunting to learn.  Since I use Magic Loop so much, I want to help spread the love!  So I made a video (at bottom of post). I hope this video explains things in a way that makes it easier for you to understand, if you are struggling with it.

After you have knit with the method for a while, it becomes super easy.  Some people think Magic Loop involves a lot of fiddling with pulling the needles, etc., but I can knit very fast this way and it becomes second nature.

chinook on magic loop

With Magic Loop, you can try your work on for size!  Try doing that with DPNs – doesn’t work so well


There are some reasons I love Magic Loop so much for knitting things in the round:

  1. No DPN (double point needle) tips sticking out! I hate working around those.
  2. Your work isn’t in danger of falling off when you have it on the circular cable (shown on video).  When I put my knitting down, I just slip the work from the needles onto the cable and it’s safe as can be.
  3. If you’re knitting something like a mitten in the round, you can actually slip your work from the needles onto the cable and try the mitten on for size! A big plus.
  4. Makes it super simple to knit something tiny like a thumb or finger.  If you use DPNs, you have to get teeny tiny DPNs to do this and it’s a hassle.
  5. Even if I have a very long circular needle, I can knit a variety of sizes on it, because the cable part just dangles.


chinookfinger

In this video, I’m using 32″ circular needles, which is a great average size for a variety of different projects.  My favorite circular needles are always Addi Lace. They are super smooth and super sharp, resulting in work that just glides along and needle points that are inserting easily for knitting.

One thing I failed to mention in the video (sorry!) is a helpful little tip:  After you get your project going, the dangling tail yarn becomes your “marker” for the beginning of your work and to tell you where the right side of the work is. This is helpful in case you forget if you have knit half of the round or all of the round – if the tail yarn is dangling on the right, you have completed a round.  Sometimes if you are knitting a project that is just a single solid color, you can get mixed up.

tail end on the left:  you are in the middle of a row.
tail end on the right:   you are at the beginning of a row.


If you have any questions, feel free to ask in the comment section or email me. Good luck and enjoy Magic Loop!

Elaine


h1

Knit Stars

November 23, 2012

I’m knitting these cute stars for Christmas and they are so much fun.  They are a free downloadable pattern from Webs.  I can see making these in all kinds of colors. The pattern calls for sport weight yarn, but I knitted them in worsted.  It doesn’t really matter for these – it just depends on how big you want them.

These stars use a really interesting construction.  You cast on 5 stitches and join in the round. You increase stitches as you go around and then start knitting the points by using turns and decreasing stitches.  After a few stars, I had the pattern memorized.

the ends are used as stuffing, so no weaving in!

One thing I liked about knitting these was there was no ends to weave in!  I hate weaving in ends.  You use the ends as stuffing.  So if you want the stars to be plumper, leave longer ends.

sewing the two halves together is so easy

I knit these using Magic Loop, which made it so easy.   No DPN tips to mess around with.  These were pretty fast to knit, also – one star from start to finish takes about an hour and a half.

I gave the stars a little soak after I knit them and laid them flat on a towel to block. Then I sewed the two halves together, stuffing the ends in as I went.  I crocheted a little loop at the top so I could hang them.

Wouldn’t these be cute in pinks and reds for Valentine’s Day?  I could even see knitting a bunch of them in a room’s colors and throwing them in a big bowl on a coffee table.  So many possibilities.

Pattern:  Knit Stars
needles:  US #6 circular
yarn:   Worsted Wool
Ravelry Page

h1

Chinook Fingerless Gloves

October 1, 2012

Image

Can you stand another Jared Flood pattern?  I can’t believe what a roll I’m on with his designs.  What can I say  –  I love this guy’s stuff. I’ve knitted a lot of fingerless mittens but I wanted to do gloves this time, with individual fingers, but without the tips so I can still use my phone.  So when I saw his Chinook gloves, I knew this was it.

I just did one modification to the pattern –  I did not rib the fingers.   I just don’t like that K1, P1 rib for the fingers, so I did a plain stockinette stitch and knit them until I liked the length.  I did them a bit long because really, all you need is the very tip of your fingers to stick out to use your phone.  The next pair I knit may even have full pinky fingers.  I don’t care for the K1 P1 ribbing on the cuff and I may do a K2P2 ribbing on the next pair, like I did with these.

Also, I put the live stitches on stitch holders for the second glove because picking them up from waste yarn was too hard. The stitch holders were easier.  I also knit the entire glove using Magic Loop, which I love and allows me to try on the glove as I go, which you cannot do with DPNs.  I even did the individual fingers with Magic Loop – so much easier than trying to manipulate DPNs around a little finger. Using Addi Lace Turbo needles makes working with the fingering weight yarn super easy.

I did a little stash busting by using Dale of Norway Baby Ull, although it is not one of my favorite yarns. There is just something about that yarn that I don’t like – it doesn’t have enough structure or something.  I’m not buying any more of it, for sure.

As soon as I got finished with these gloves, although they were intended for me, my 16-year-old son wanted them.  What could I say – I love anyone appreciating my knitting, so off he went with them.  I would still like a pair so you’re going to see another set up here in the near future.  I’m trying to get some Quince Chickadee for my pair, but they are still having production problems.  It is a yarn so worth waiting for, though.  I love all the Quince yarns.

Pattern:  Chinook Fingerless Gloves
Needles:  US#0 and US#2 circular Addi Lace Turbos
Yarn: Baby Ull in black, white and charcoal
Ravelry Page

%d bloggers like this: