Archive for the ‘techniques’ Category

h1

How to Pick Up Dropped Stitches in Your Knitting

November 7, 2017

Beginning knitters very often will confront dropped stitches at some point in their knitting.  This can strike fear in them, if they don’t know how easily this situation is rectified.  Even several rows of dropped stitches is not a problem to fix.  Below I show you how to pick up single dropped stitches and then I show you how to pick up several dropped stitches.

I thought about breaking this post into two different posts, one for knit stitches and one for purl stitches but then I decided to do it all in one single post.  So this post is long.  If you are only interested in how to pick up dropped purl stitches, scroll halfway down the post for that.  I do knit stitches in the first half of the post and purl stitches in the last half.  I also have a video in the post to help you.

It helps to knit a swatch of stockinette and practice dropping and picking up stitches, until you are completely comfortable doing it.

Knitting without fear!


PICKING UP DROPPED KNIT STITCHES:

First, you need to know a knitting fundamental – how a stitch should sit properly on your left needle. Each stitch has a “left leg” and a “right leg”.  In a knit stitch, the right leg will be in the front, like this:

twisted knit stitch.jpeg

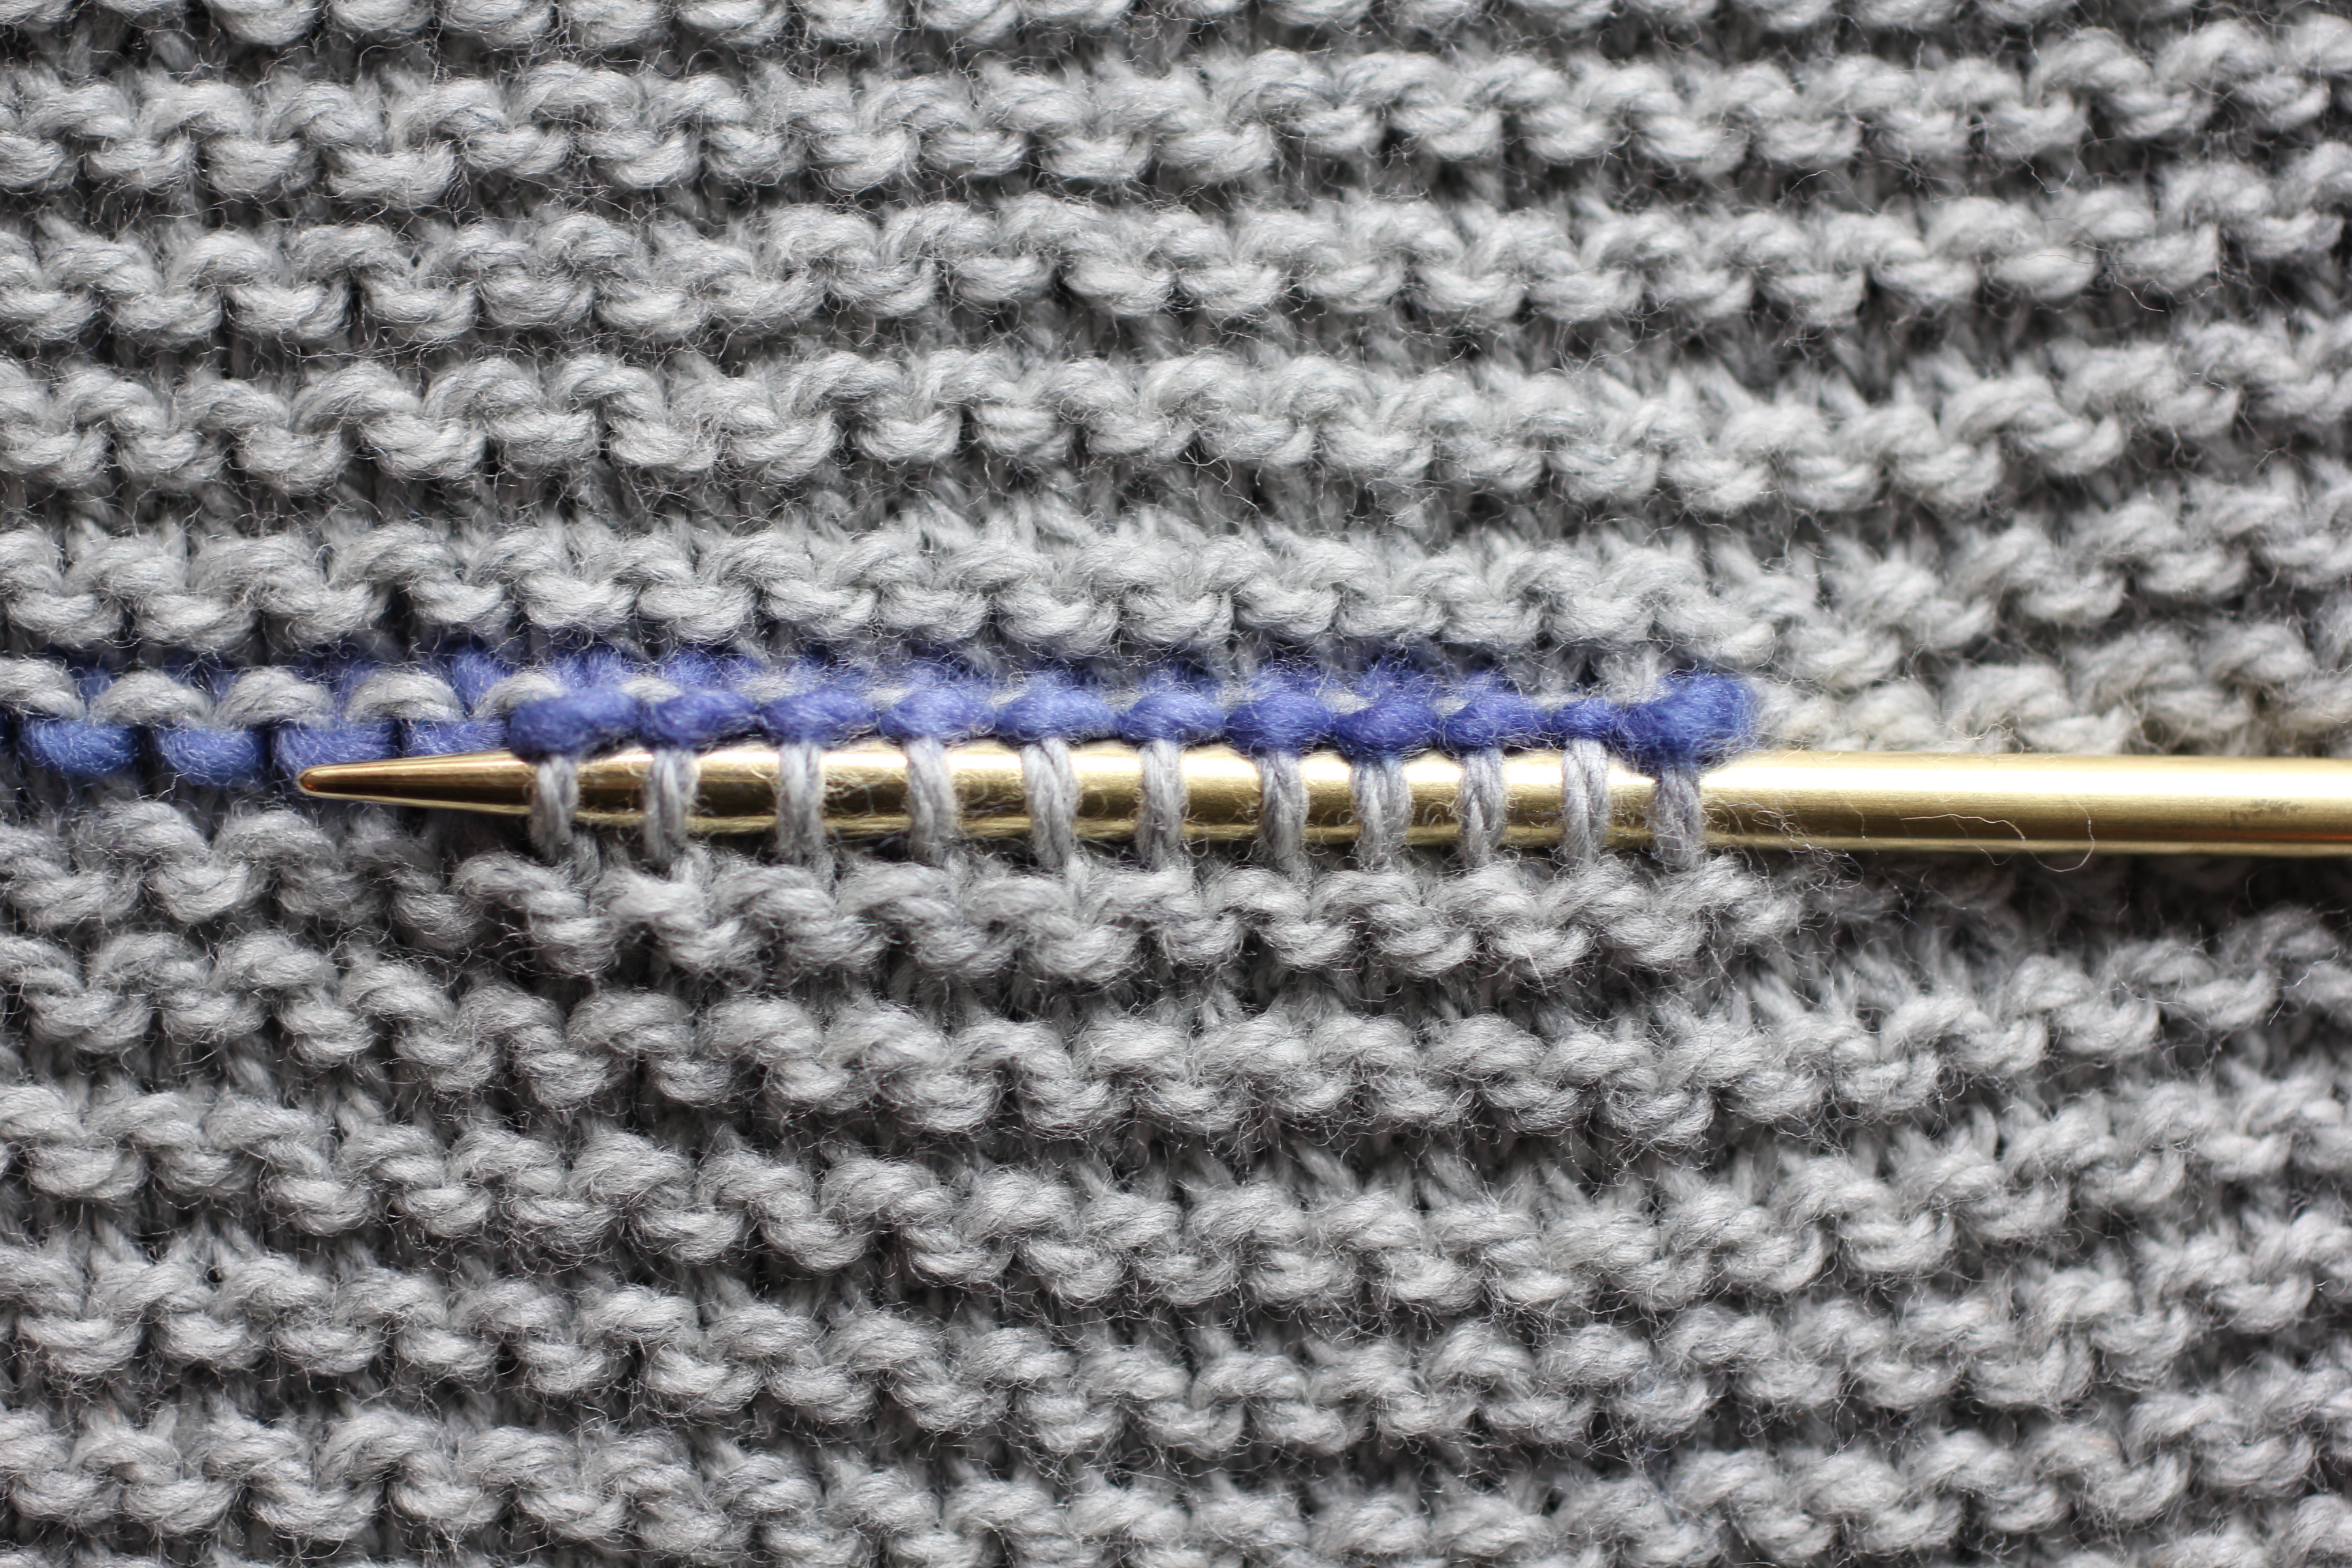
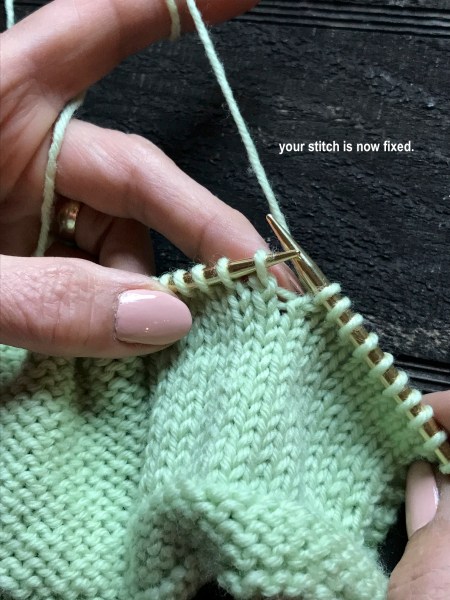
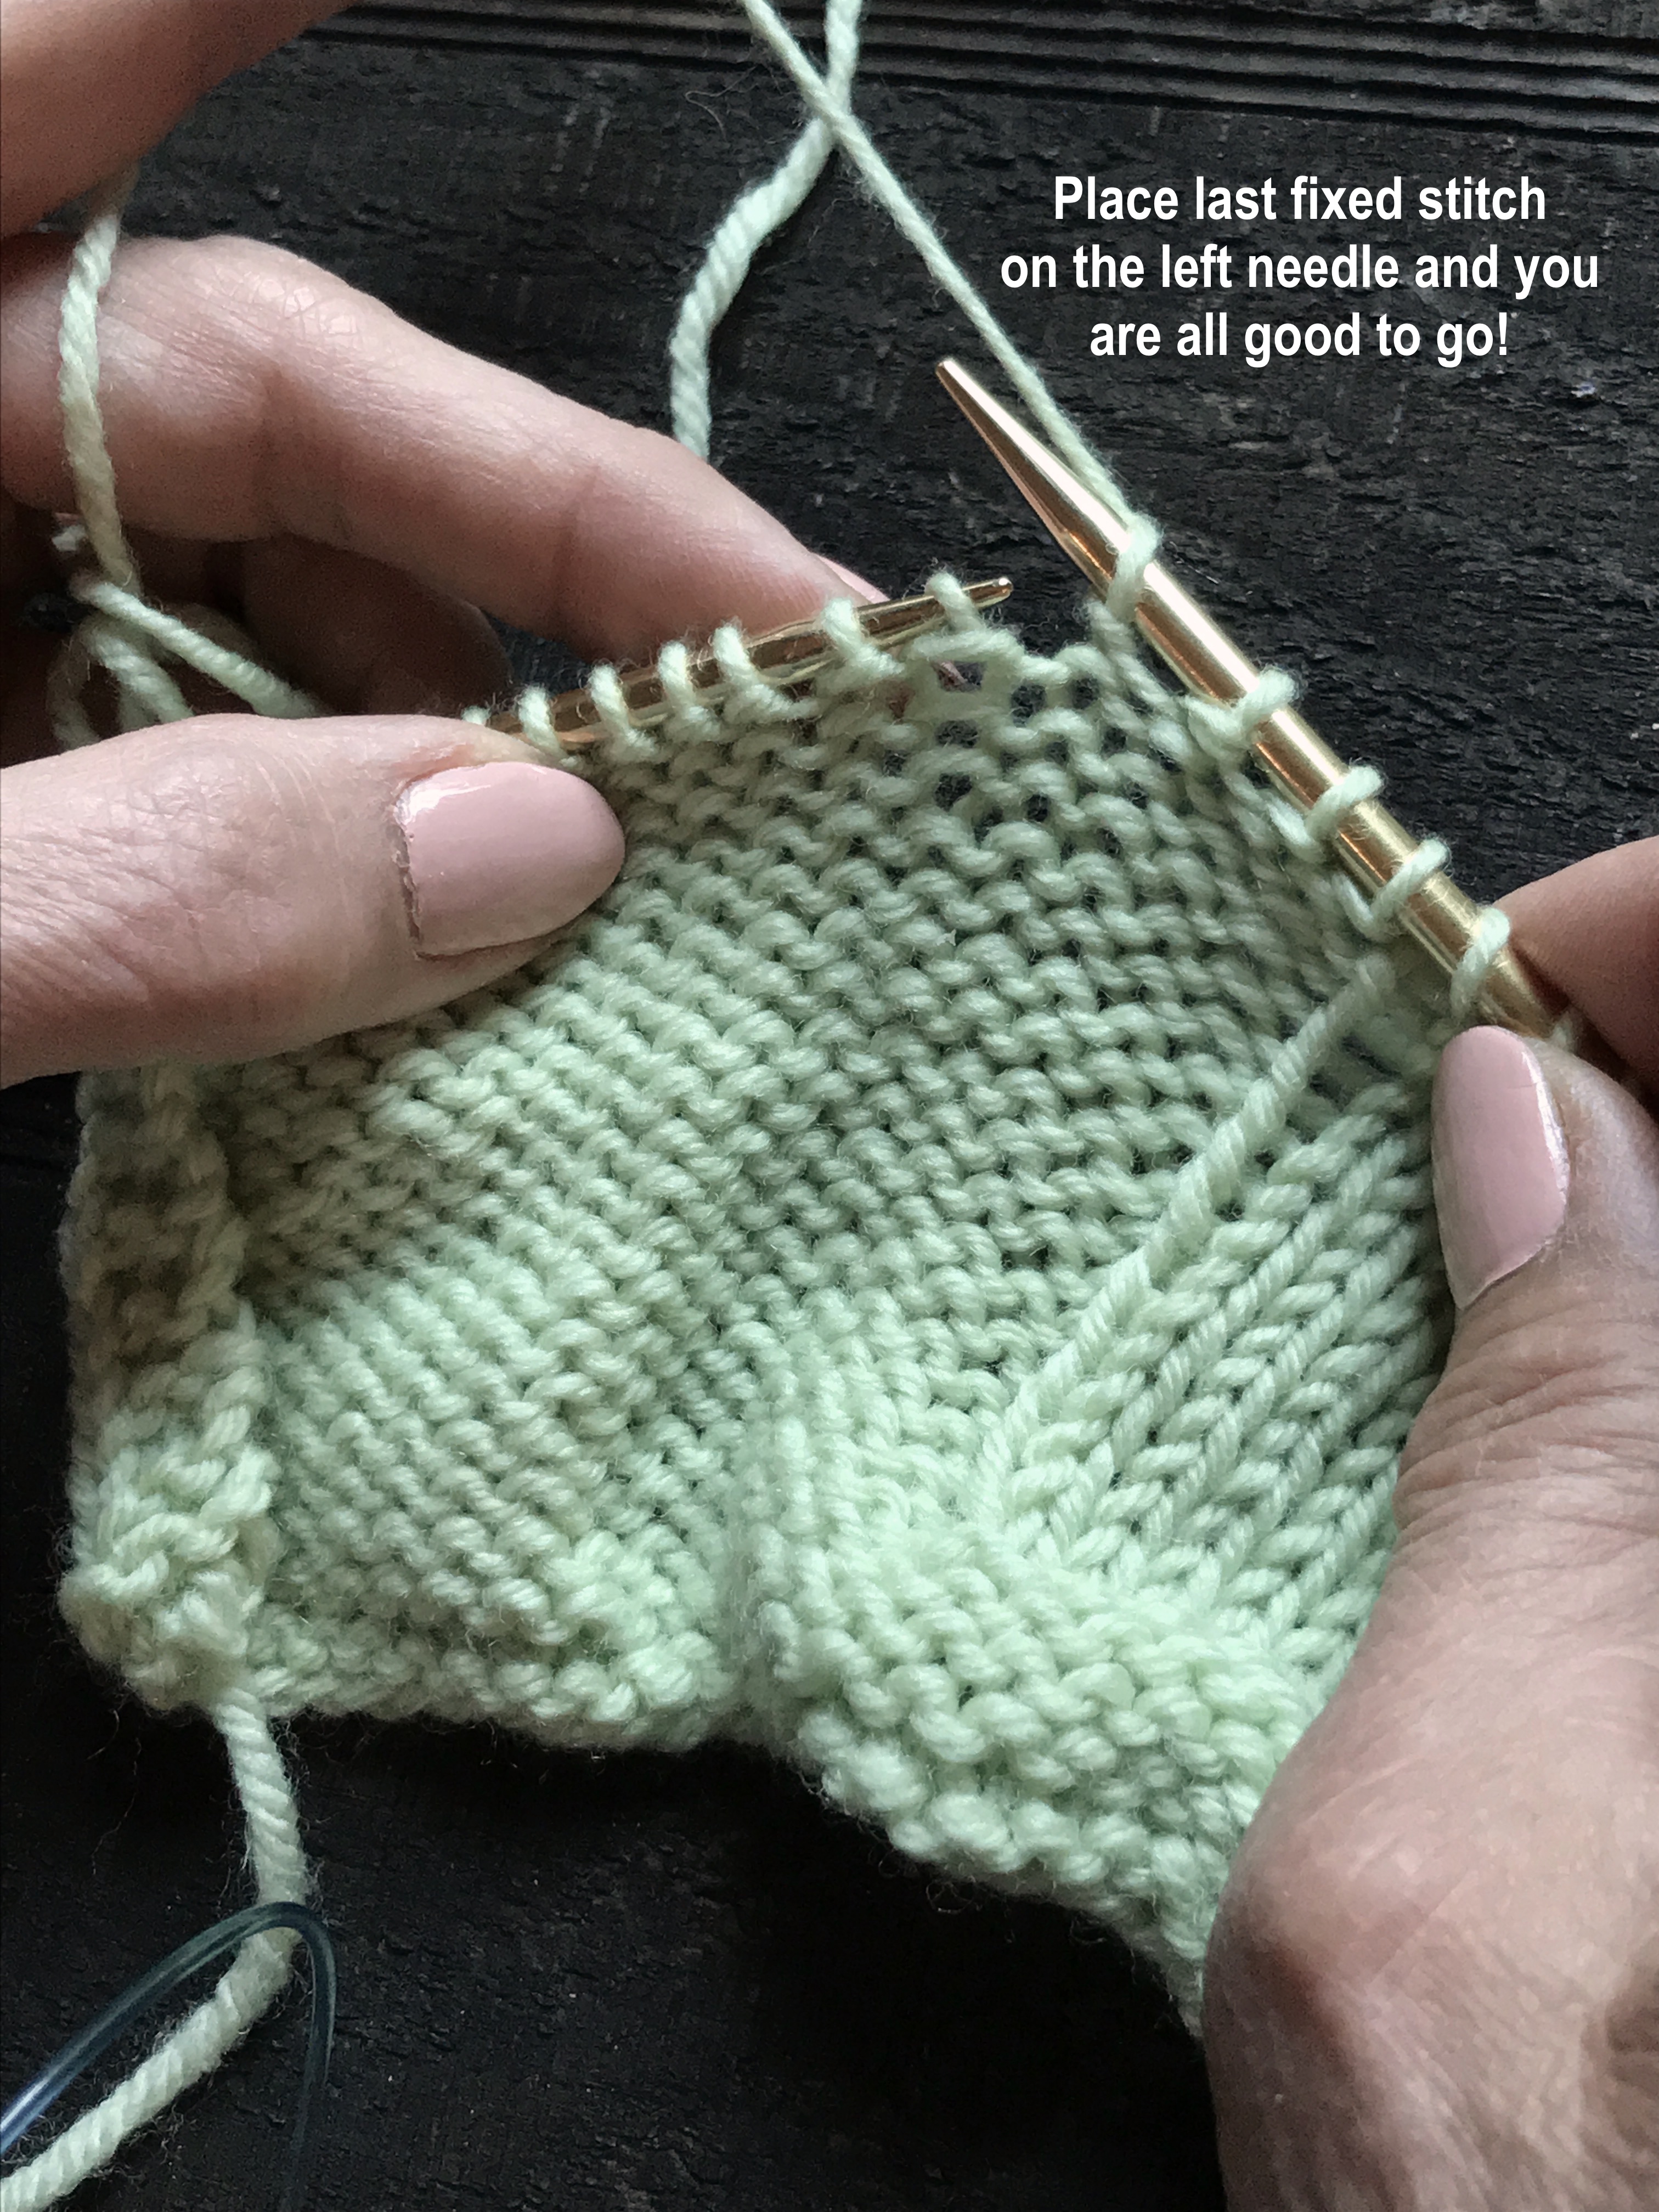
Why do you need to know this?  Because when you pick up stitches, very often they are twisted and you will have to place them back on the needle the correct way.  It’s a no brainer, once you know how a stitch should properly sit.  So, after you have picked up a stitch, make sure it is not twisted, as you will see at the end in this photo tutorial:


How to Fix a Single Dropped KNIT Stitch:

Dropped Knit Stitch 1

Dropped Knit Stitch 2

Dropped Knit Stitch 3

Dropped Knit Stitch 4

Dropped Knit Stitch 5

Dropped Knit Stitch 6

Dropped Knit Stitch 7

Dropped Knit Stitch 8


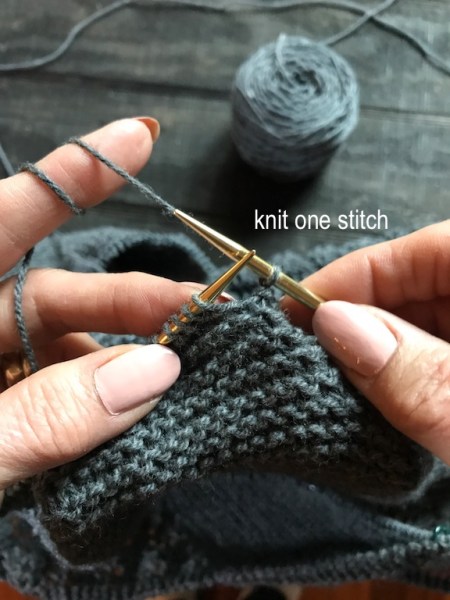
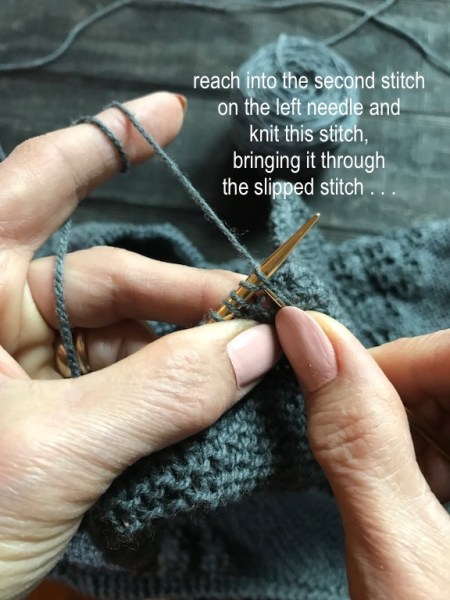
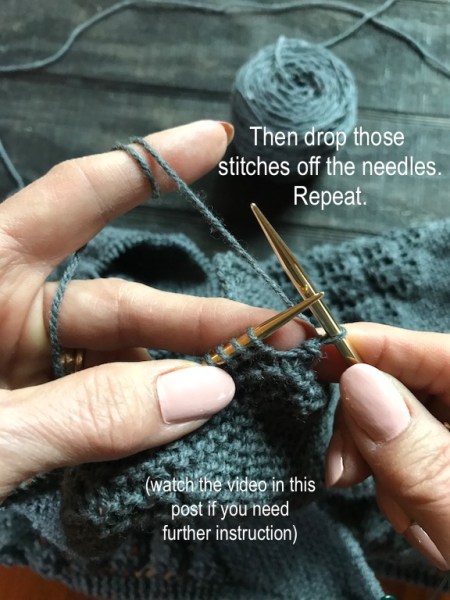
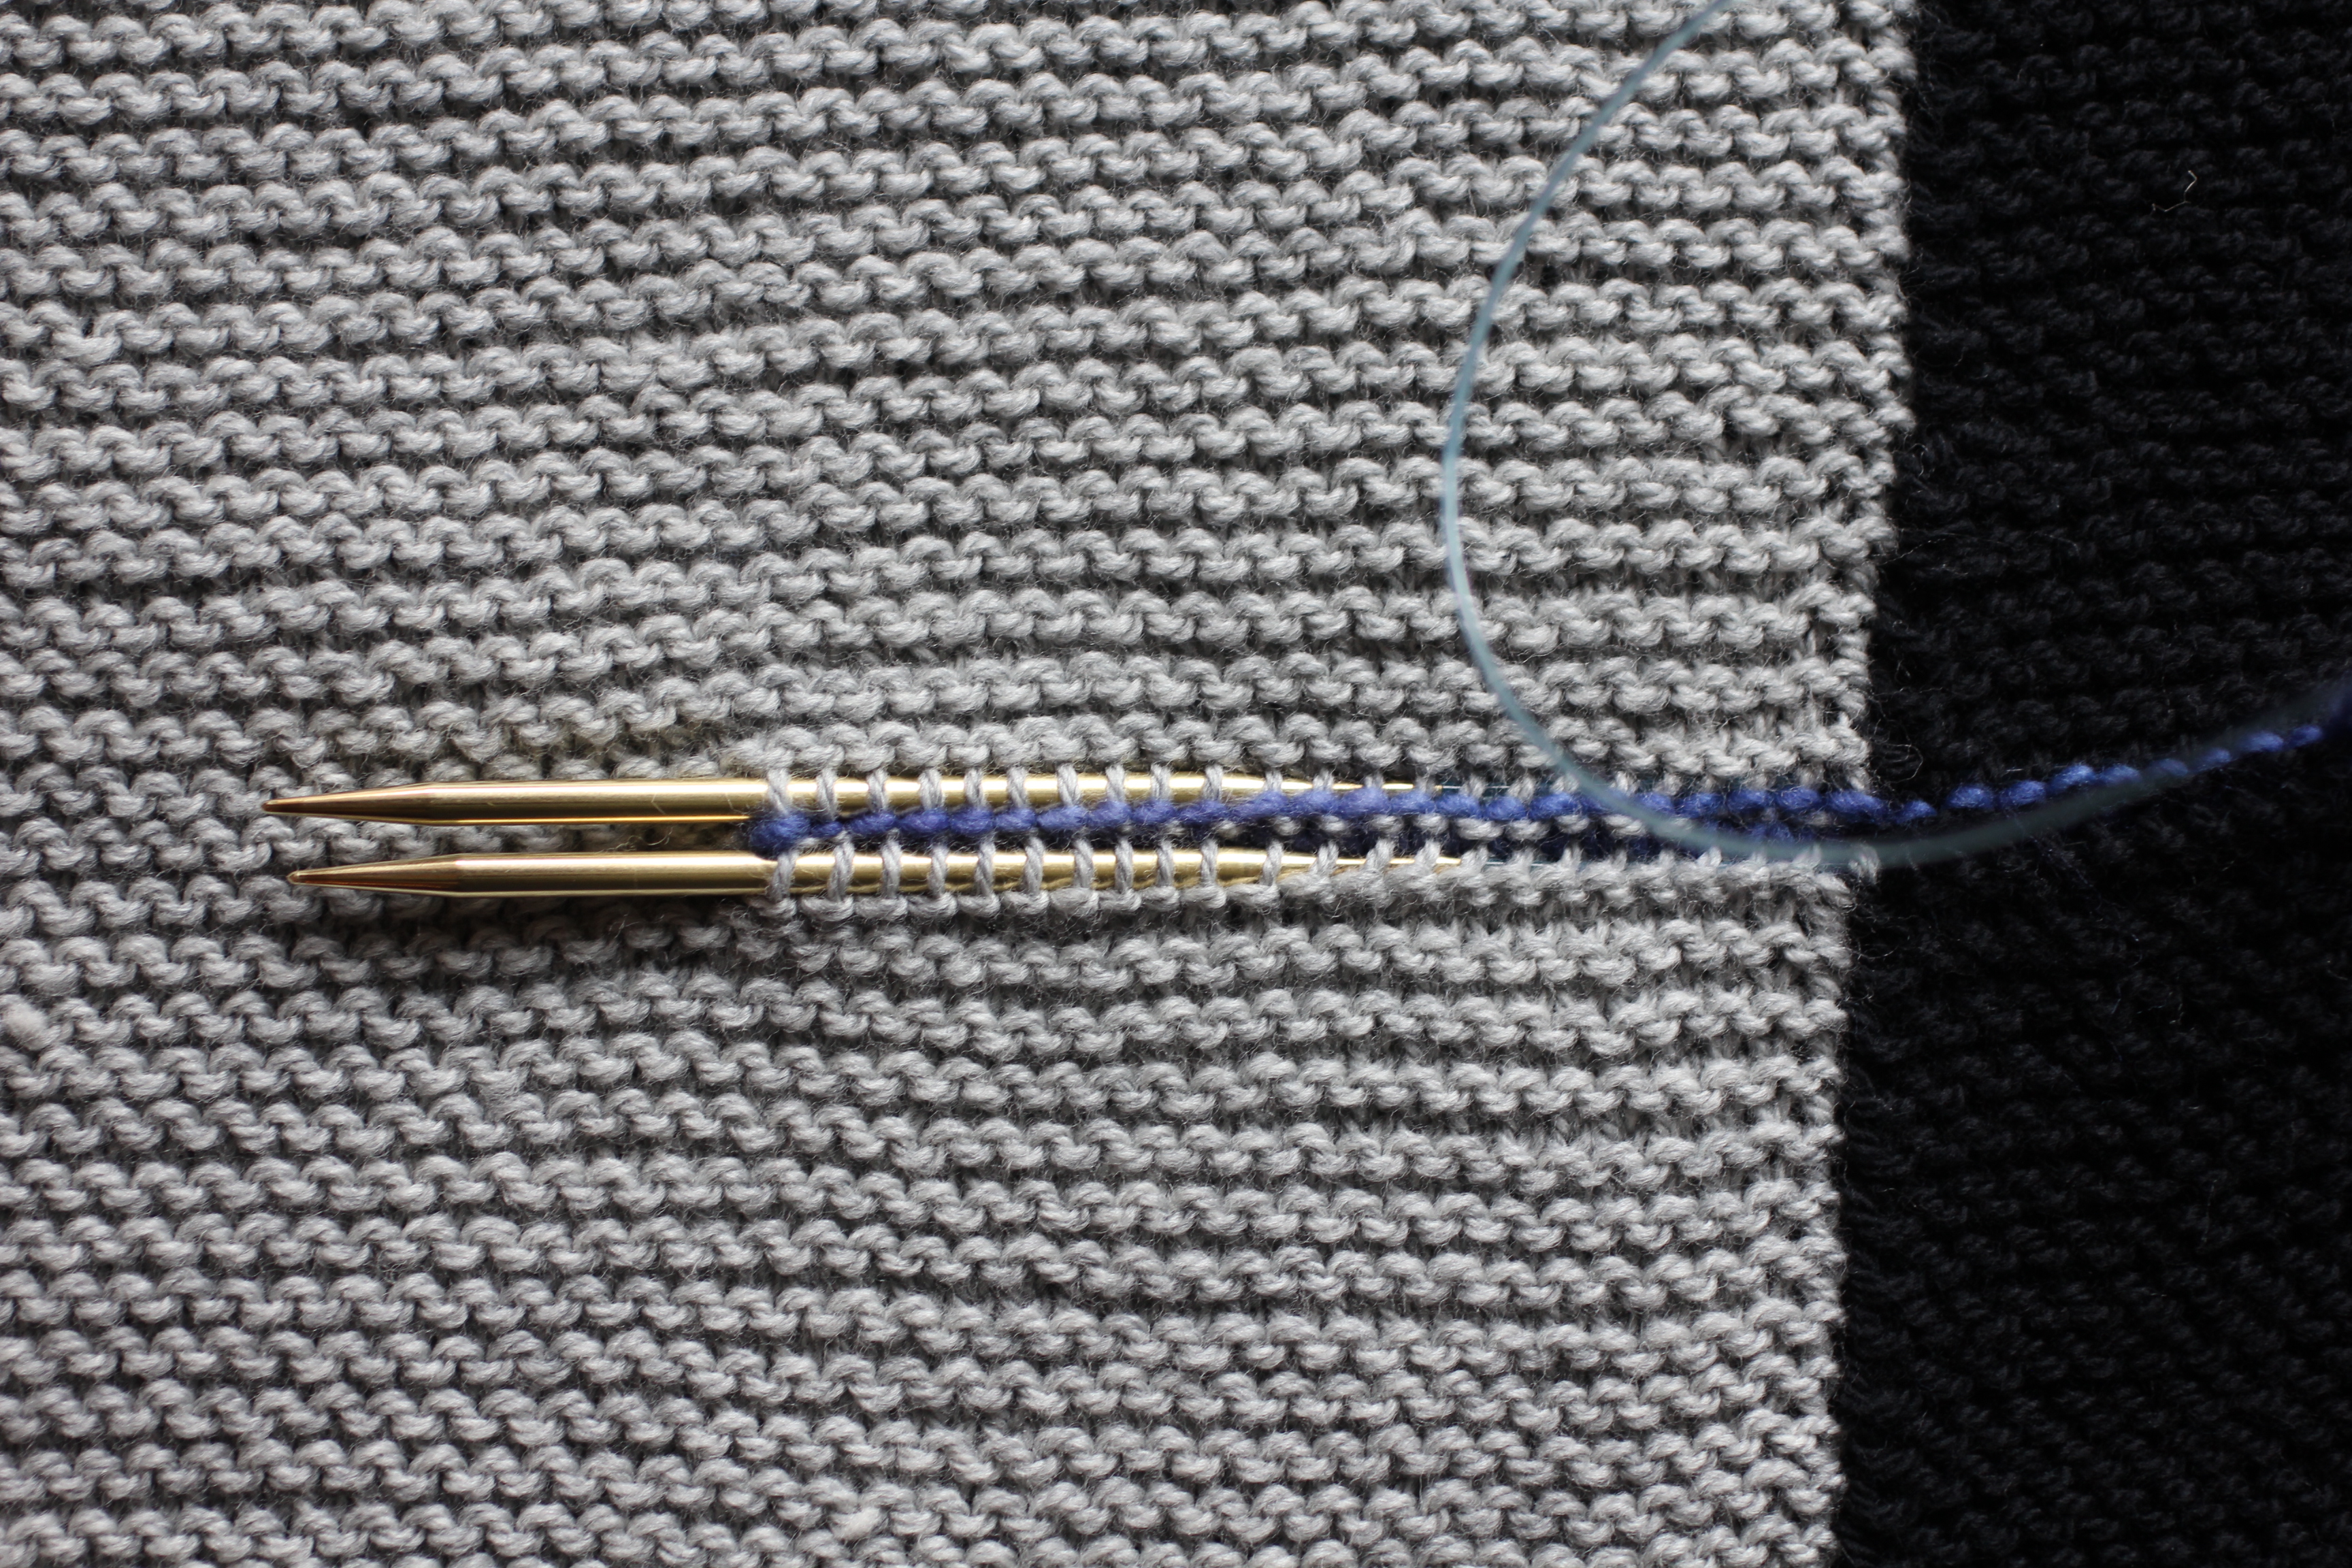
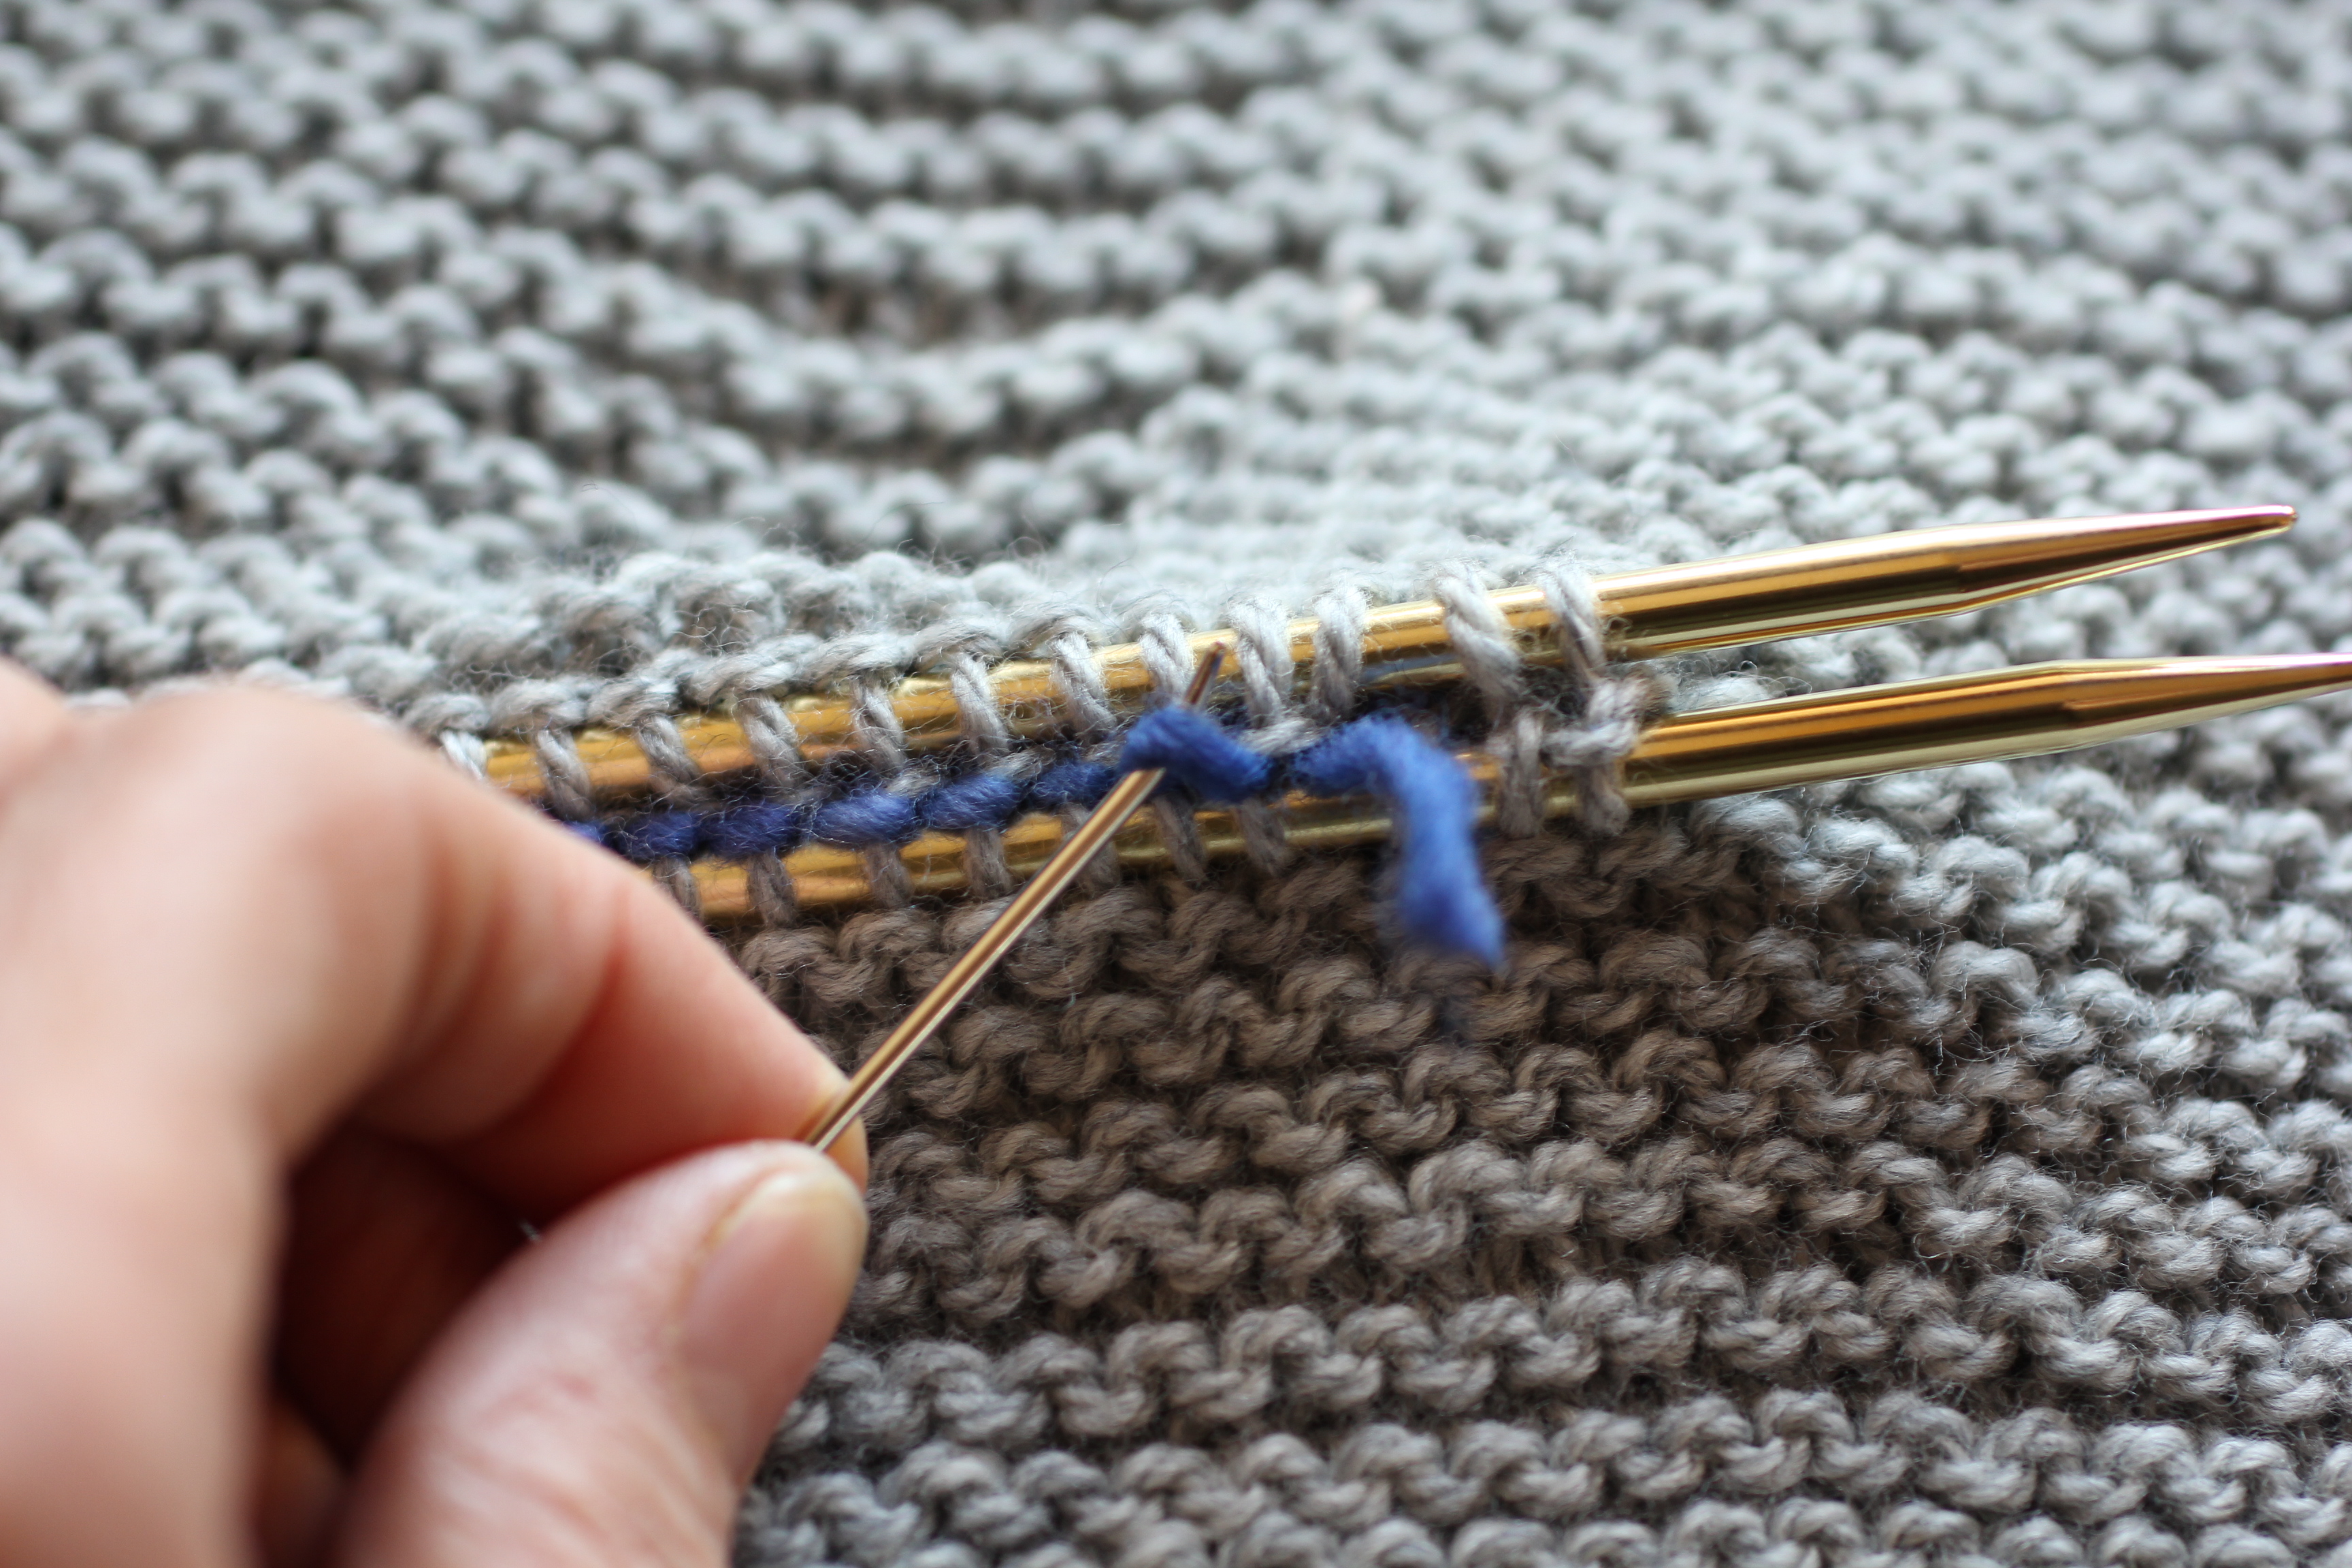
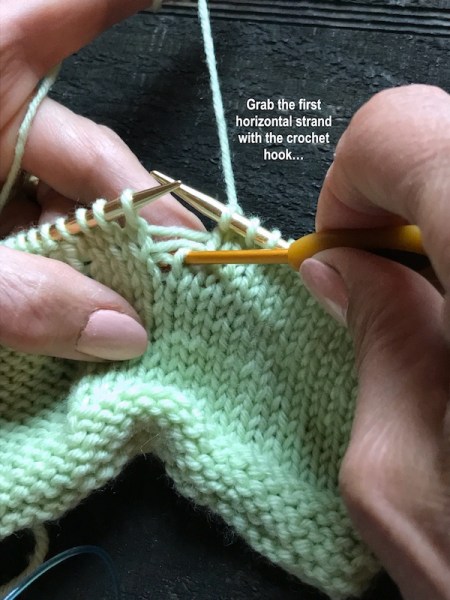
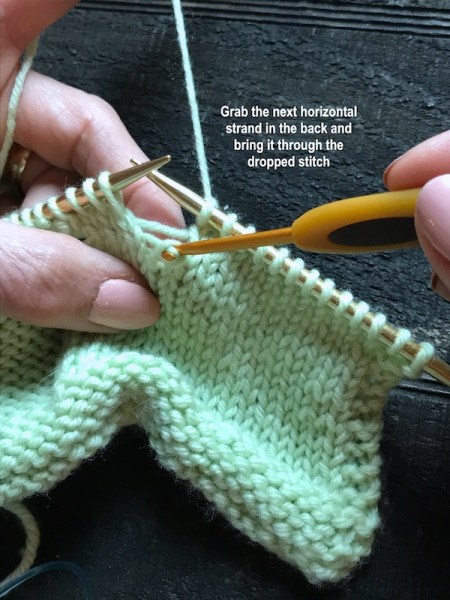
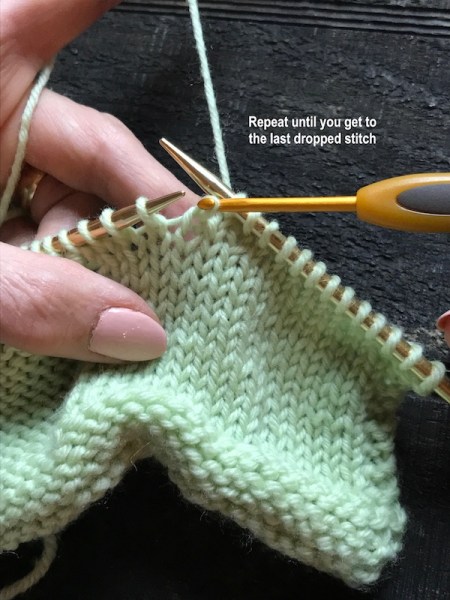
How to Fix Several Rows of Dropped KNIT stitches:

Dropped Knit Stitches 1

Dropped Knit Stitches 2

Dropped Knit Stitches 3

Dropped Knit Stitches 4

Dropped Knit Stitches 6

Dropped Knit Stitches 7

Dropped Knit Stitches 8

Dropped Knit Stitches 9


And here is a video to help you.  (First half of video is knit stitches, last half is purl stitches)  Purl Stitch Instruction starts at 3:20.


PICKING UP  DROPPED PURL STITCHES

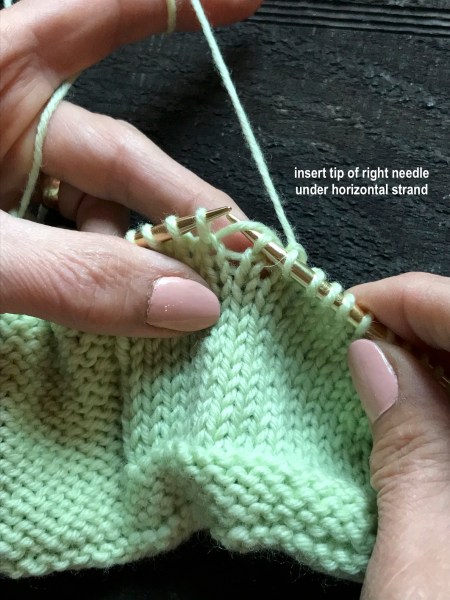
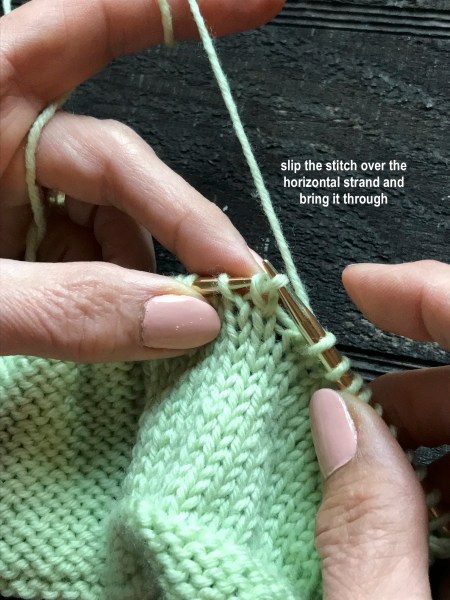
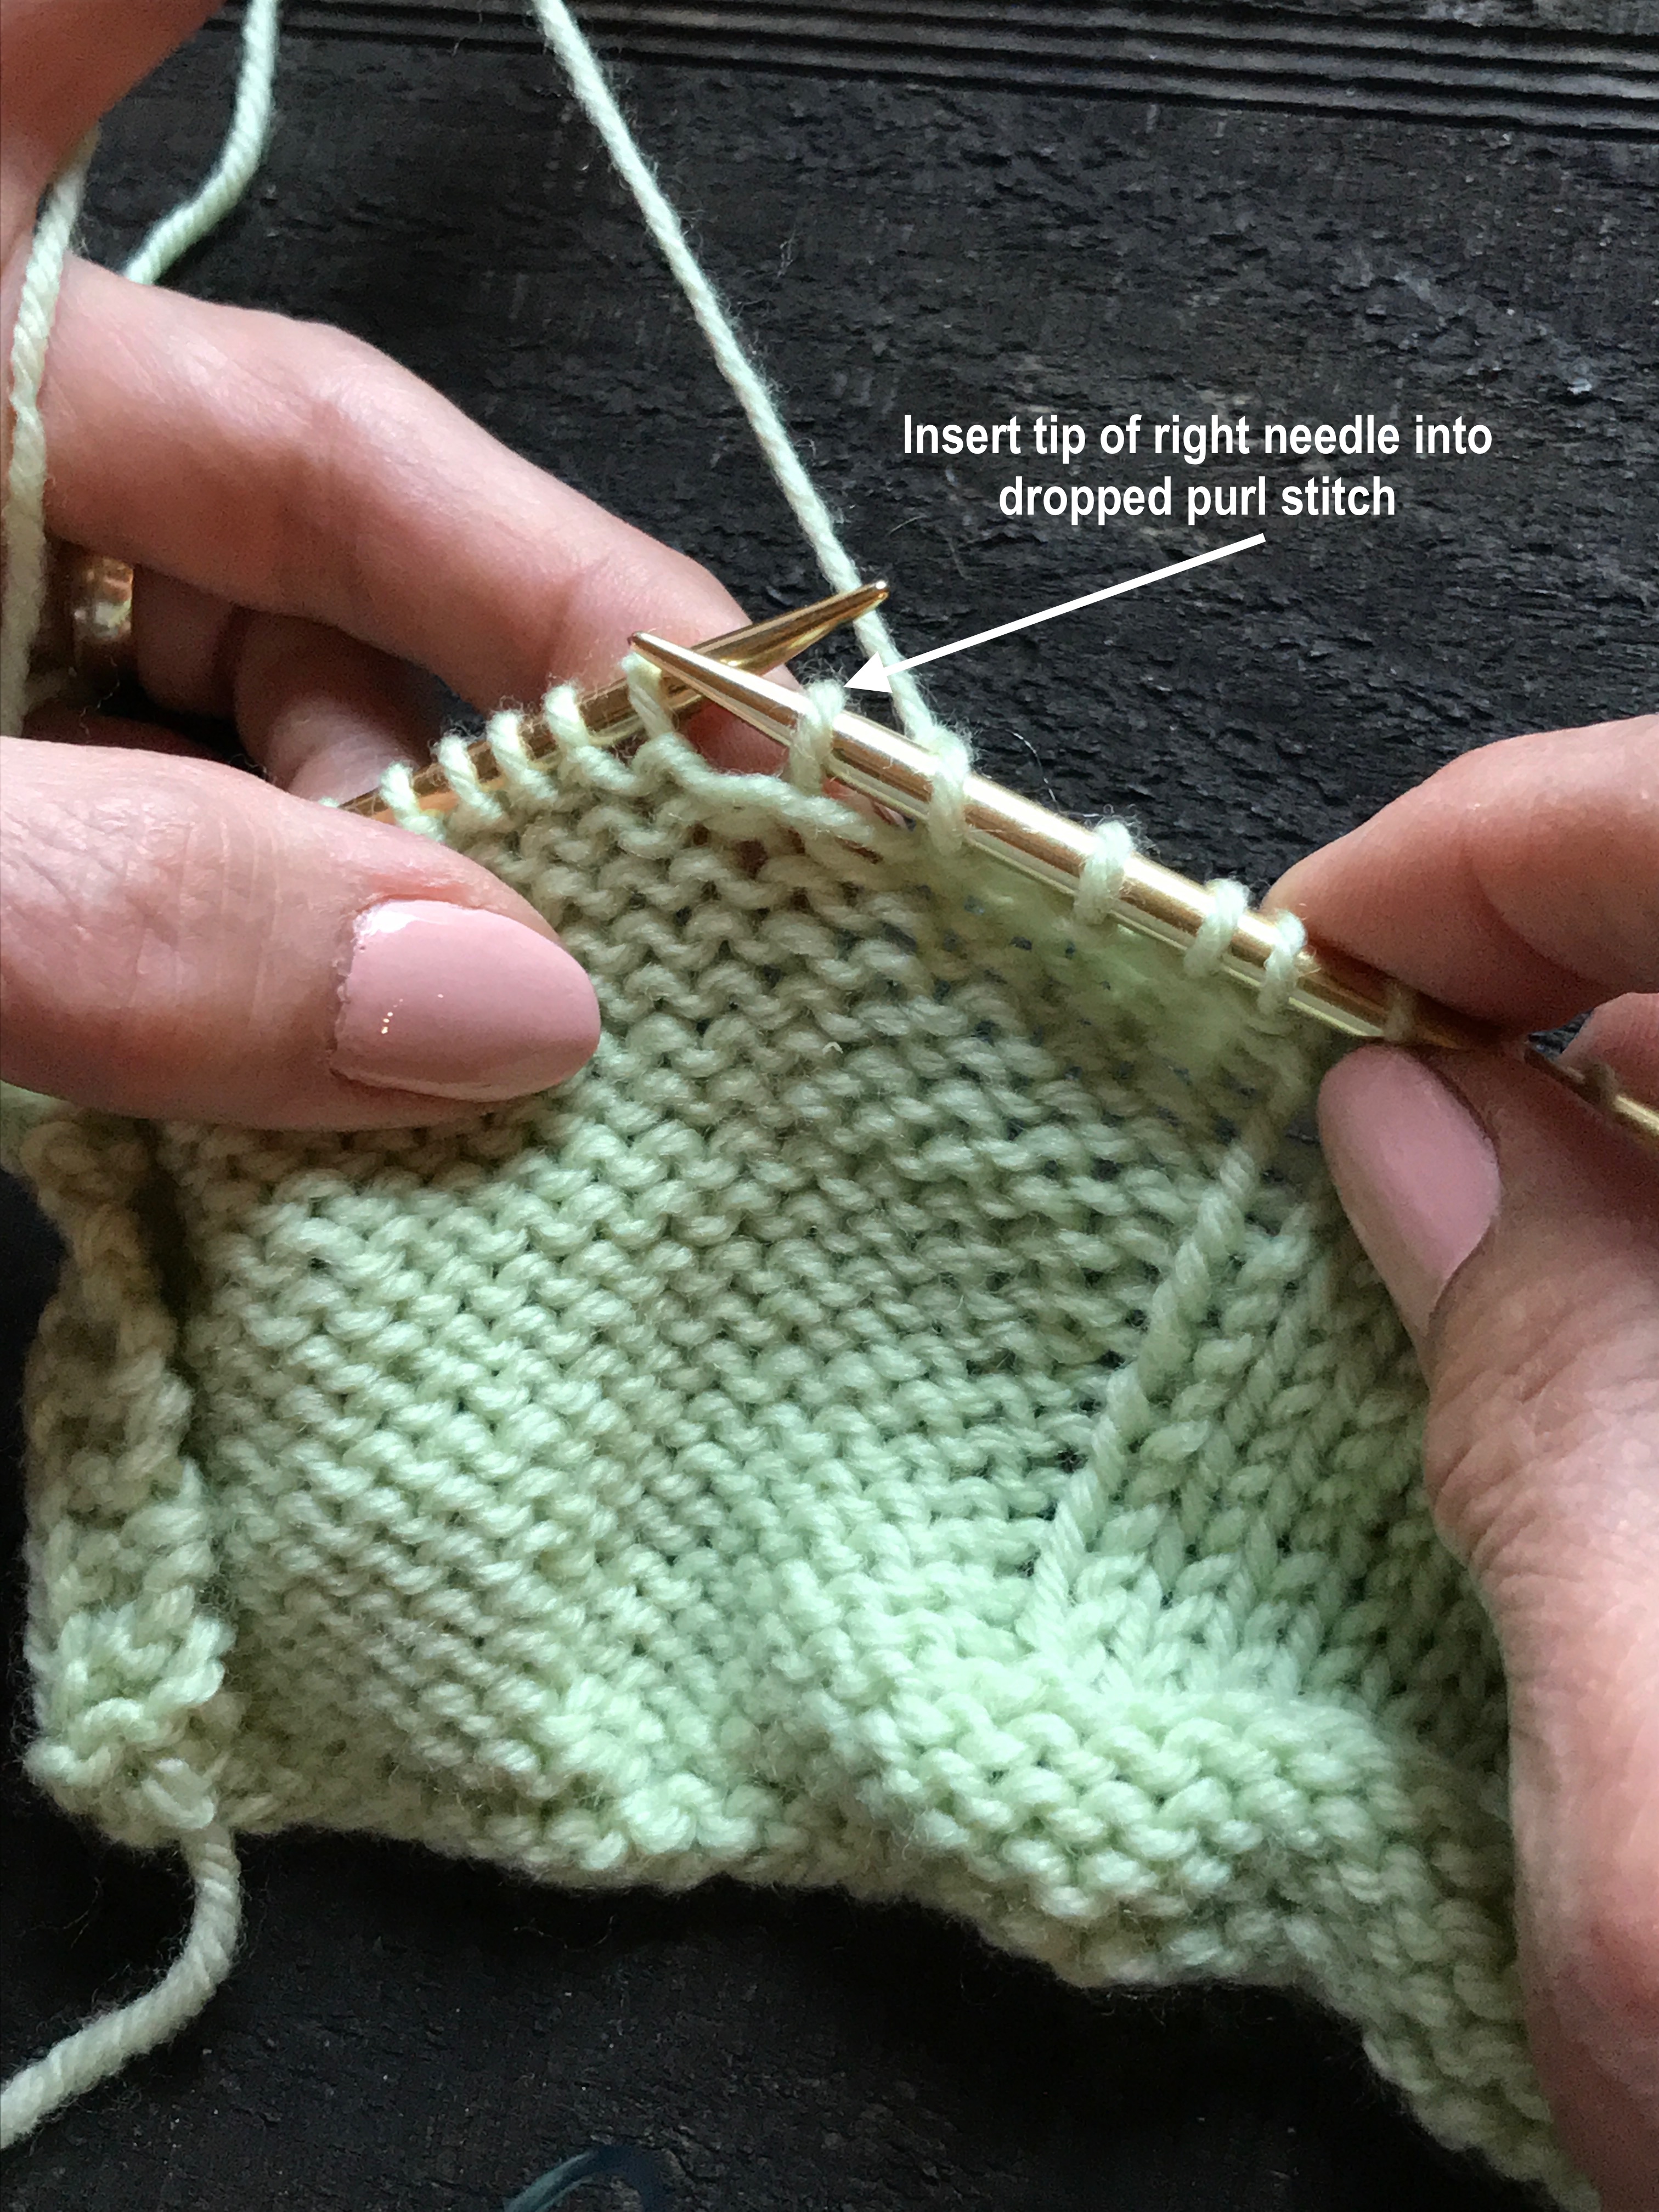
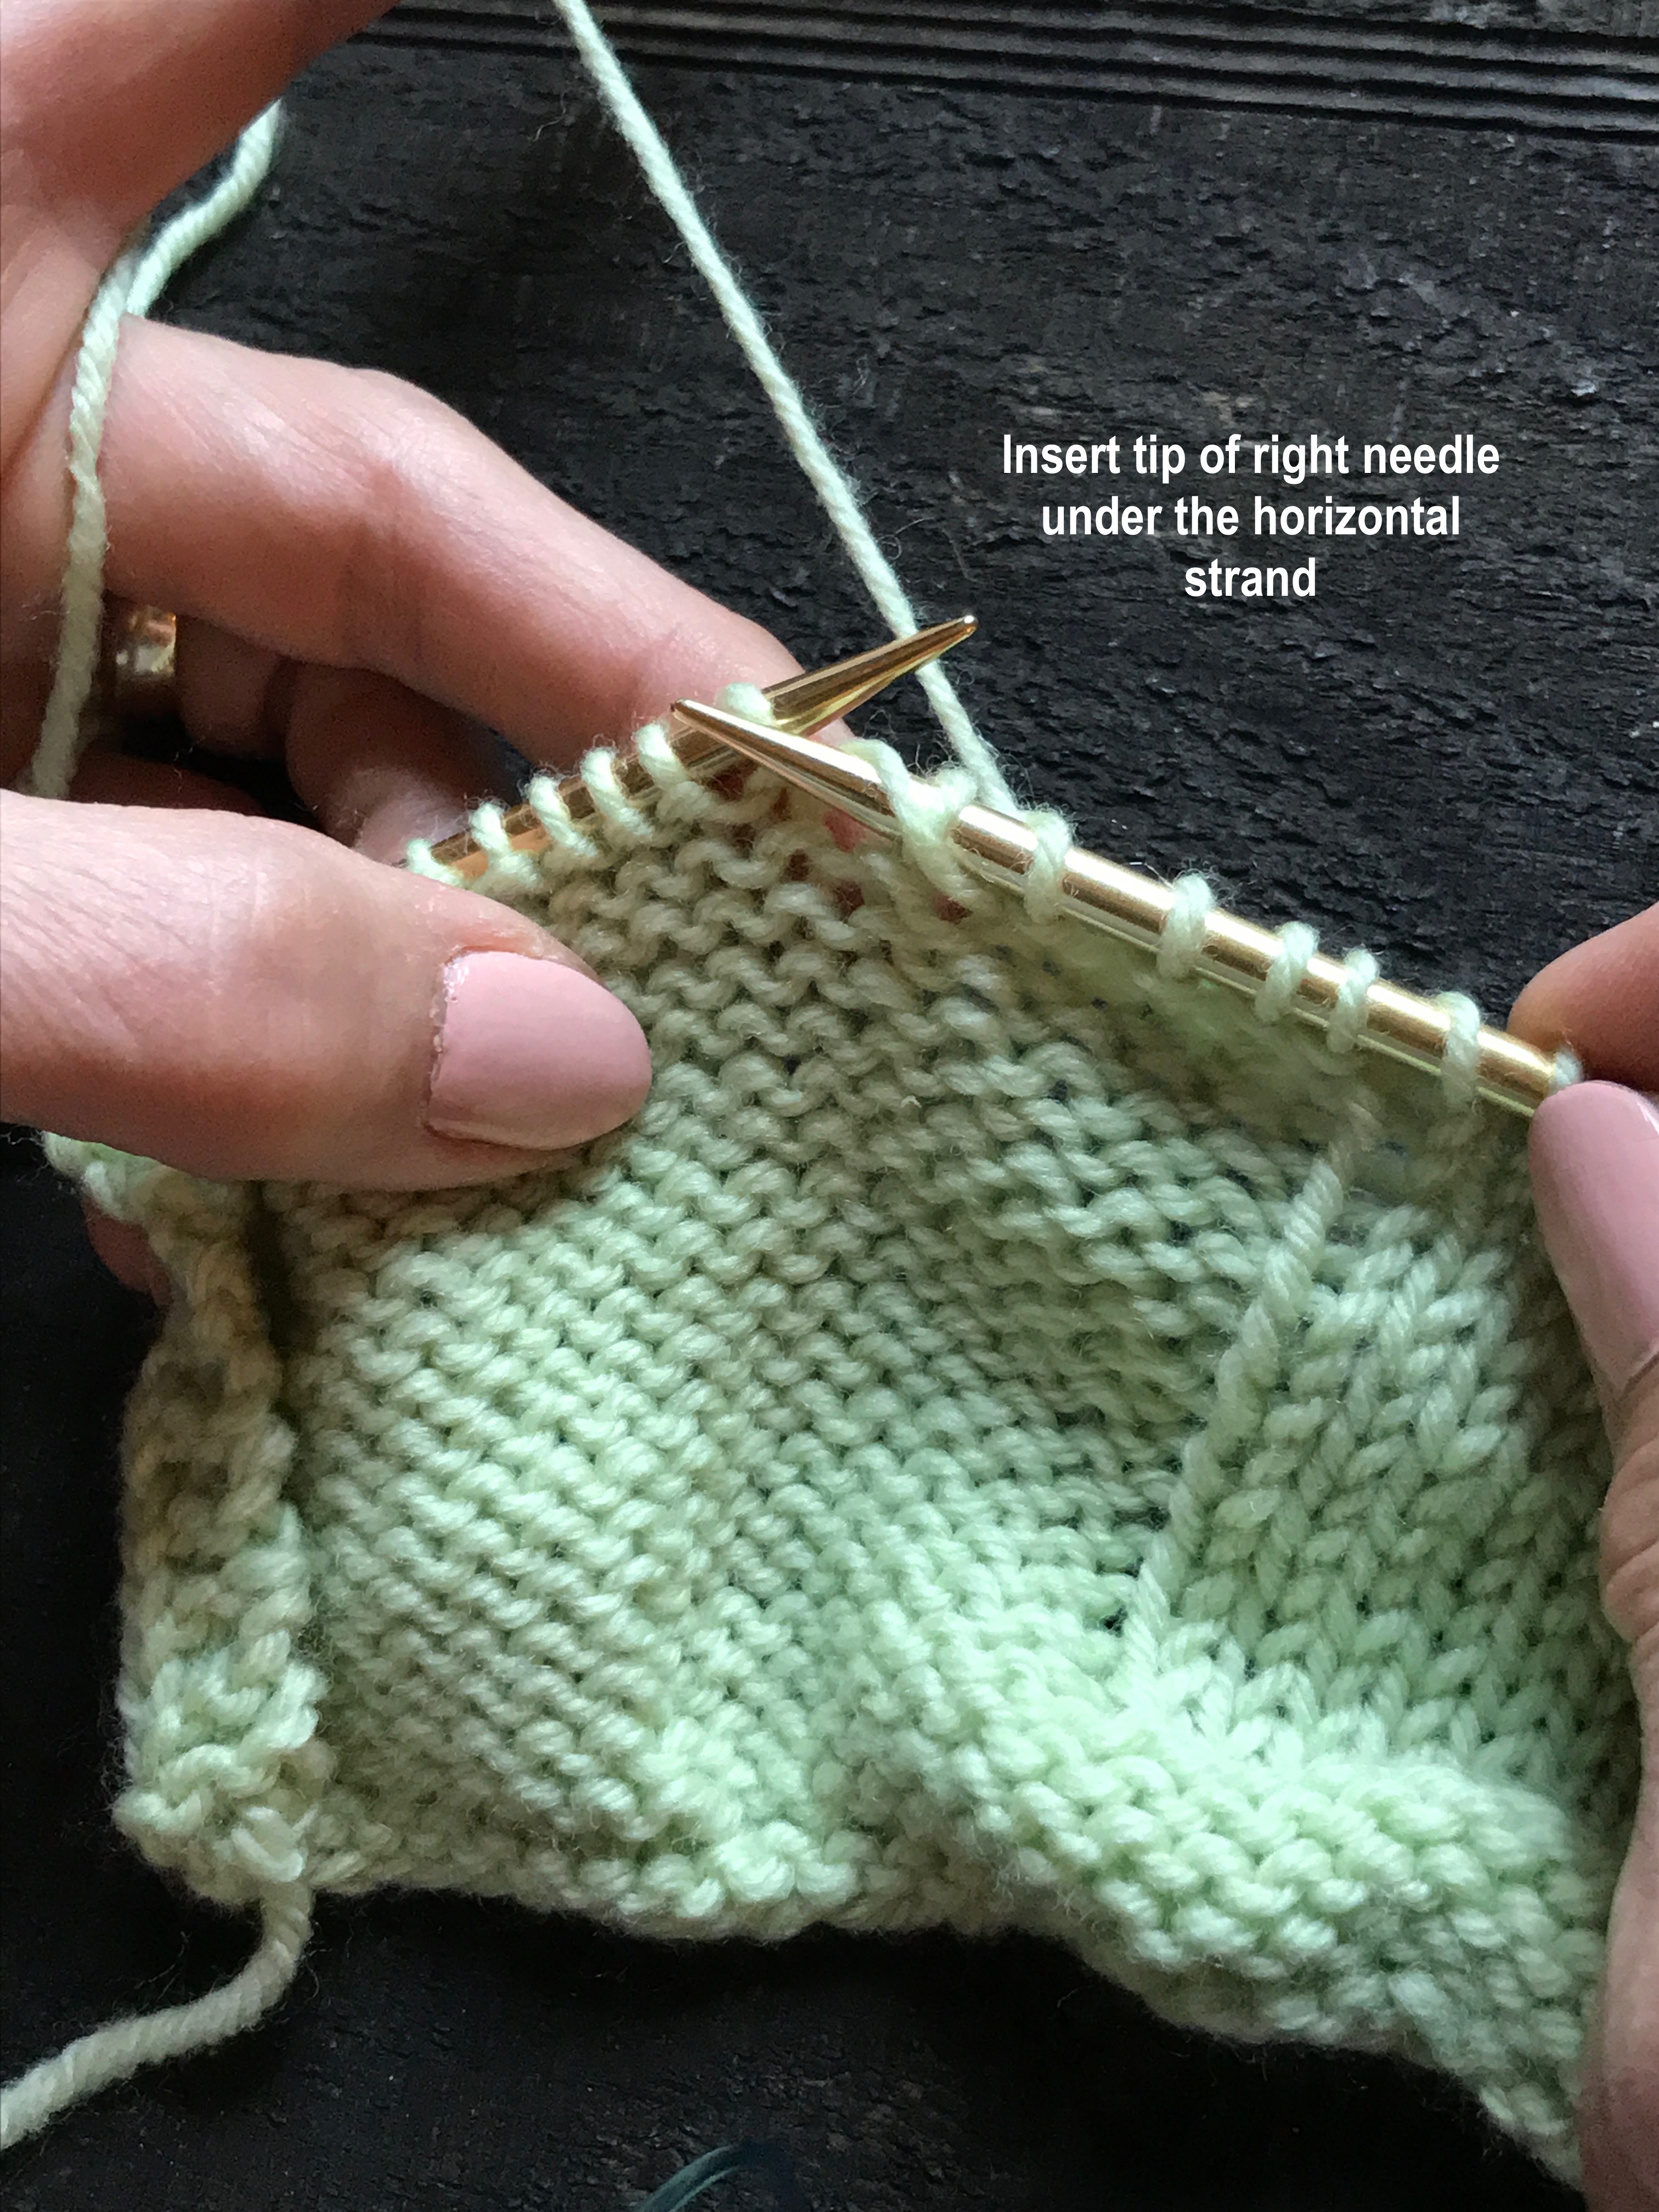
How to Pick Up a Single Dropped PURL Stitch:


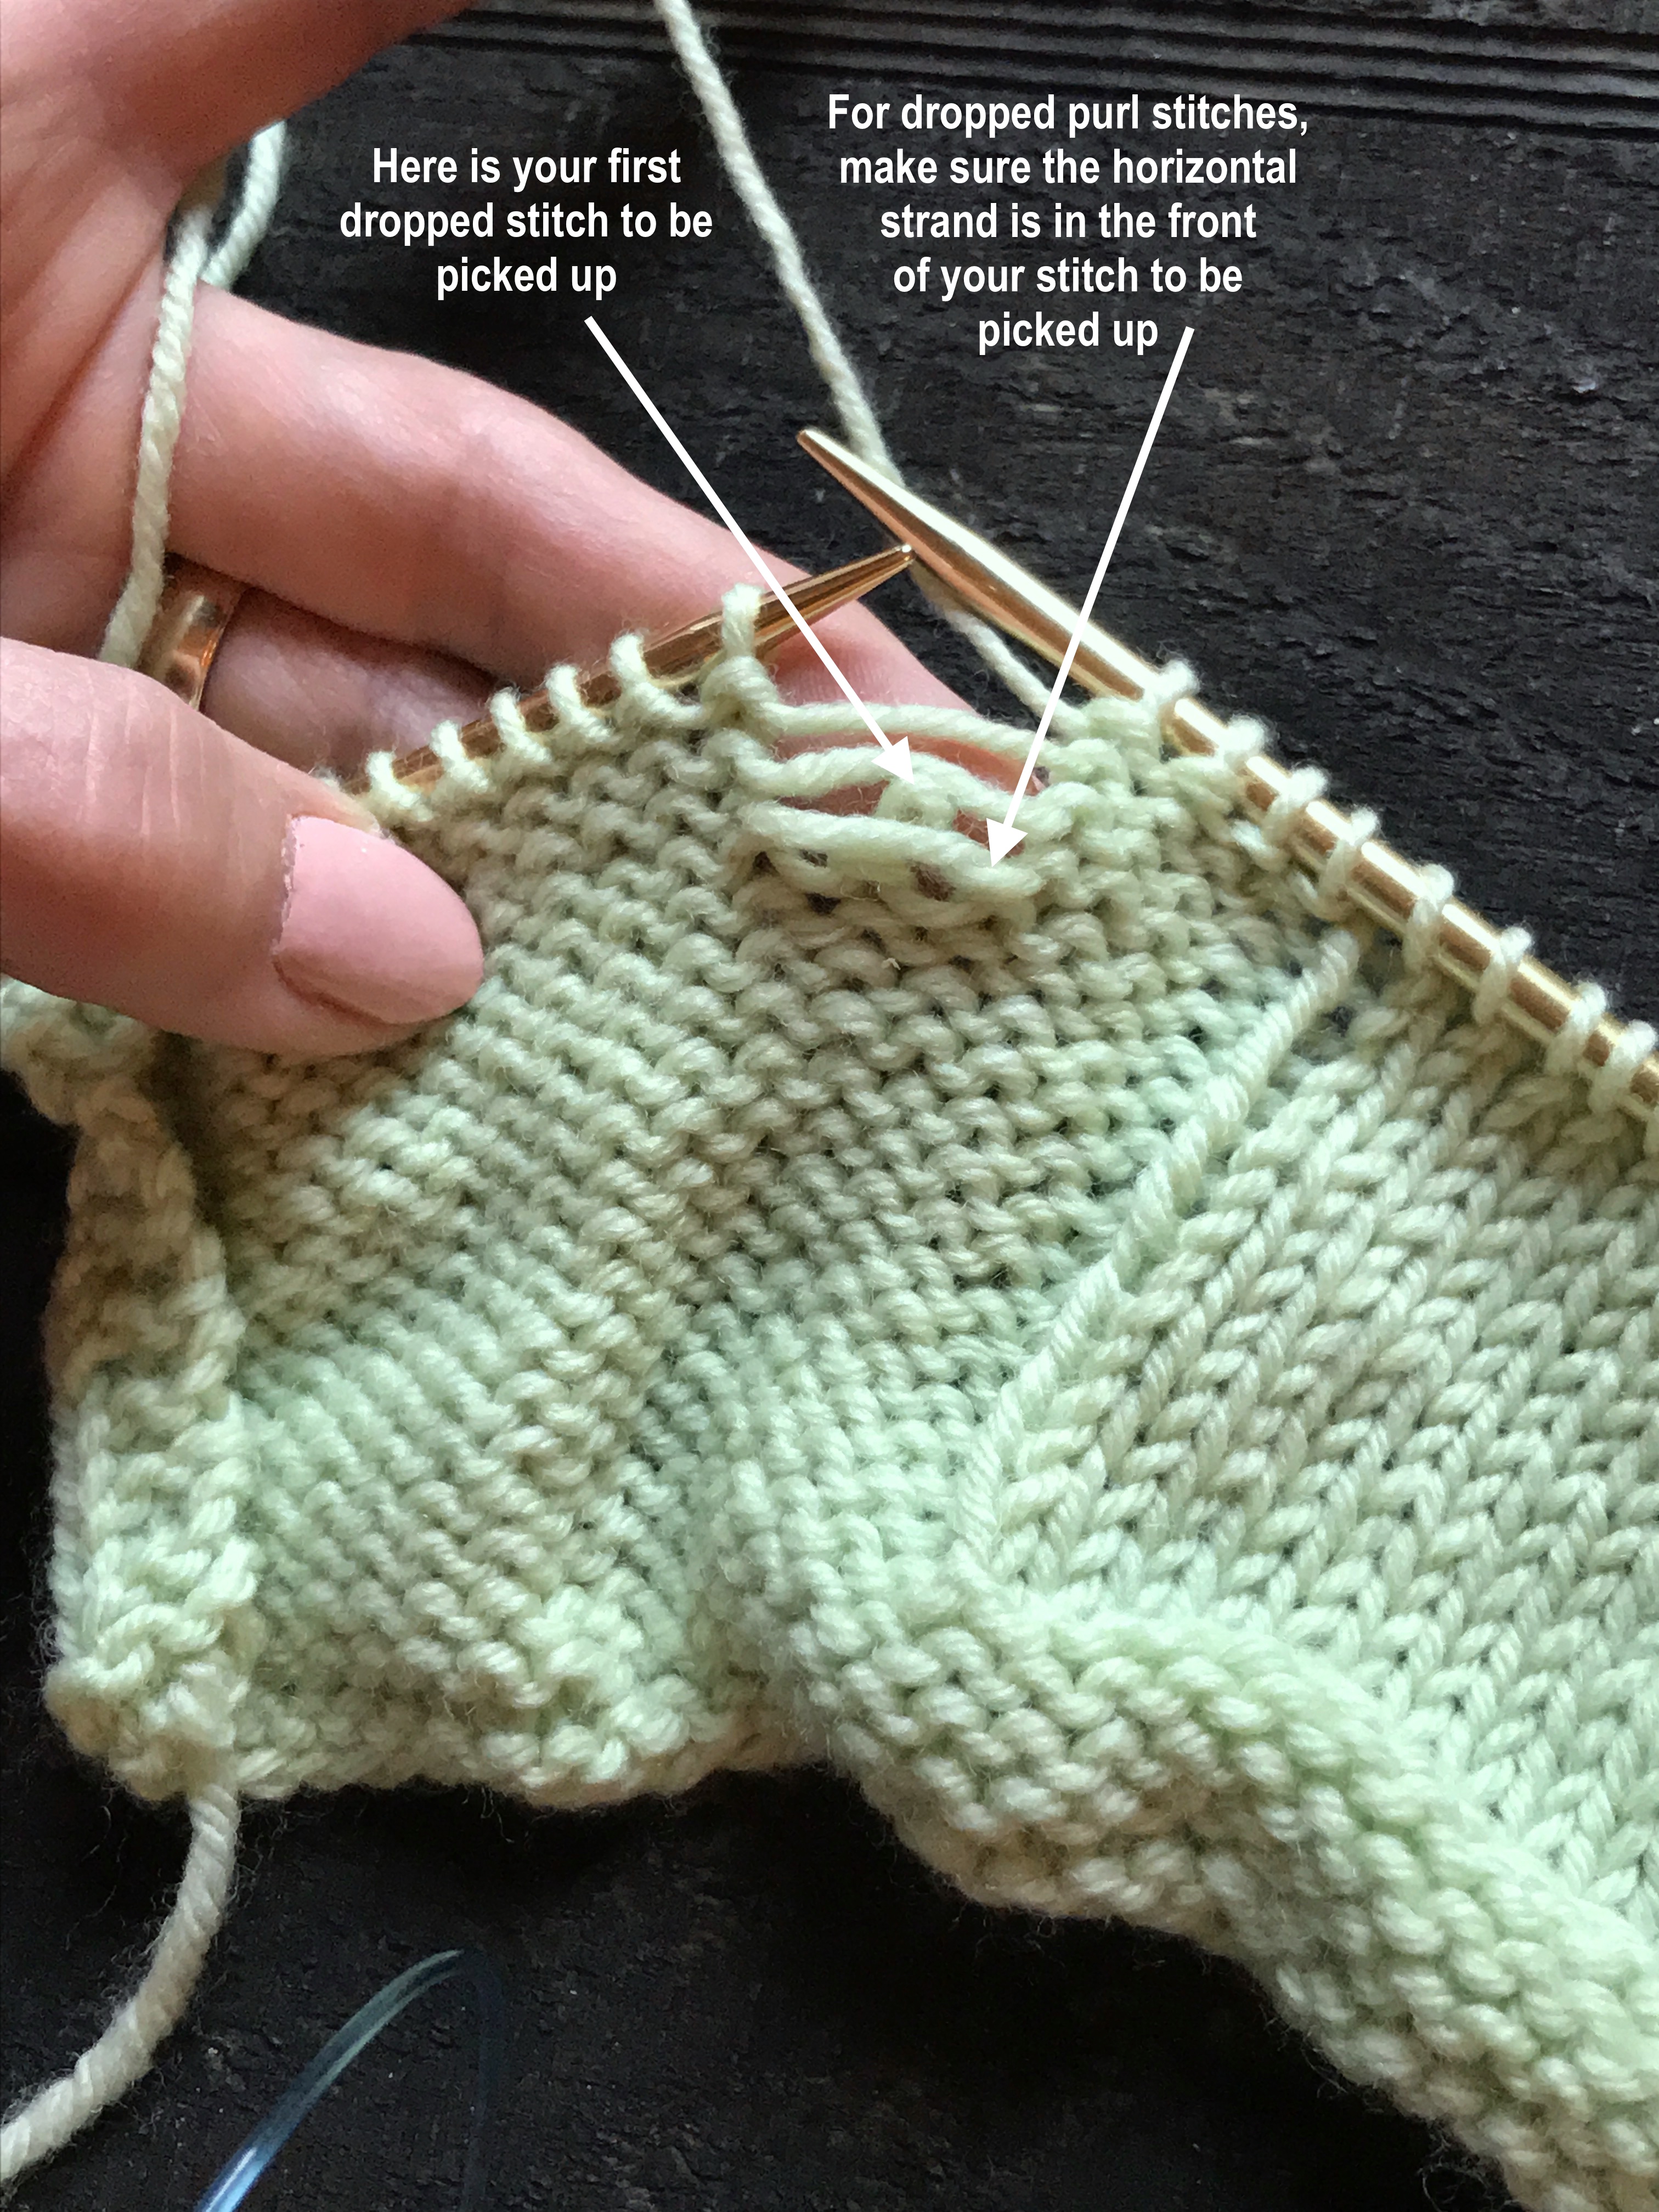
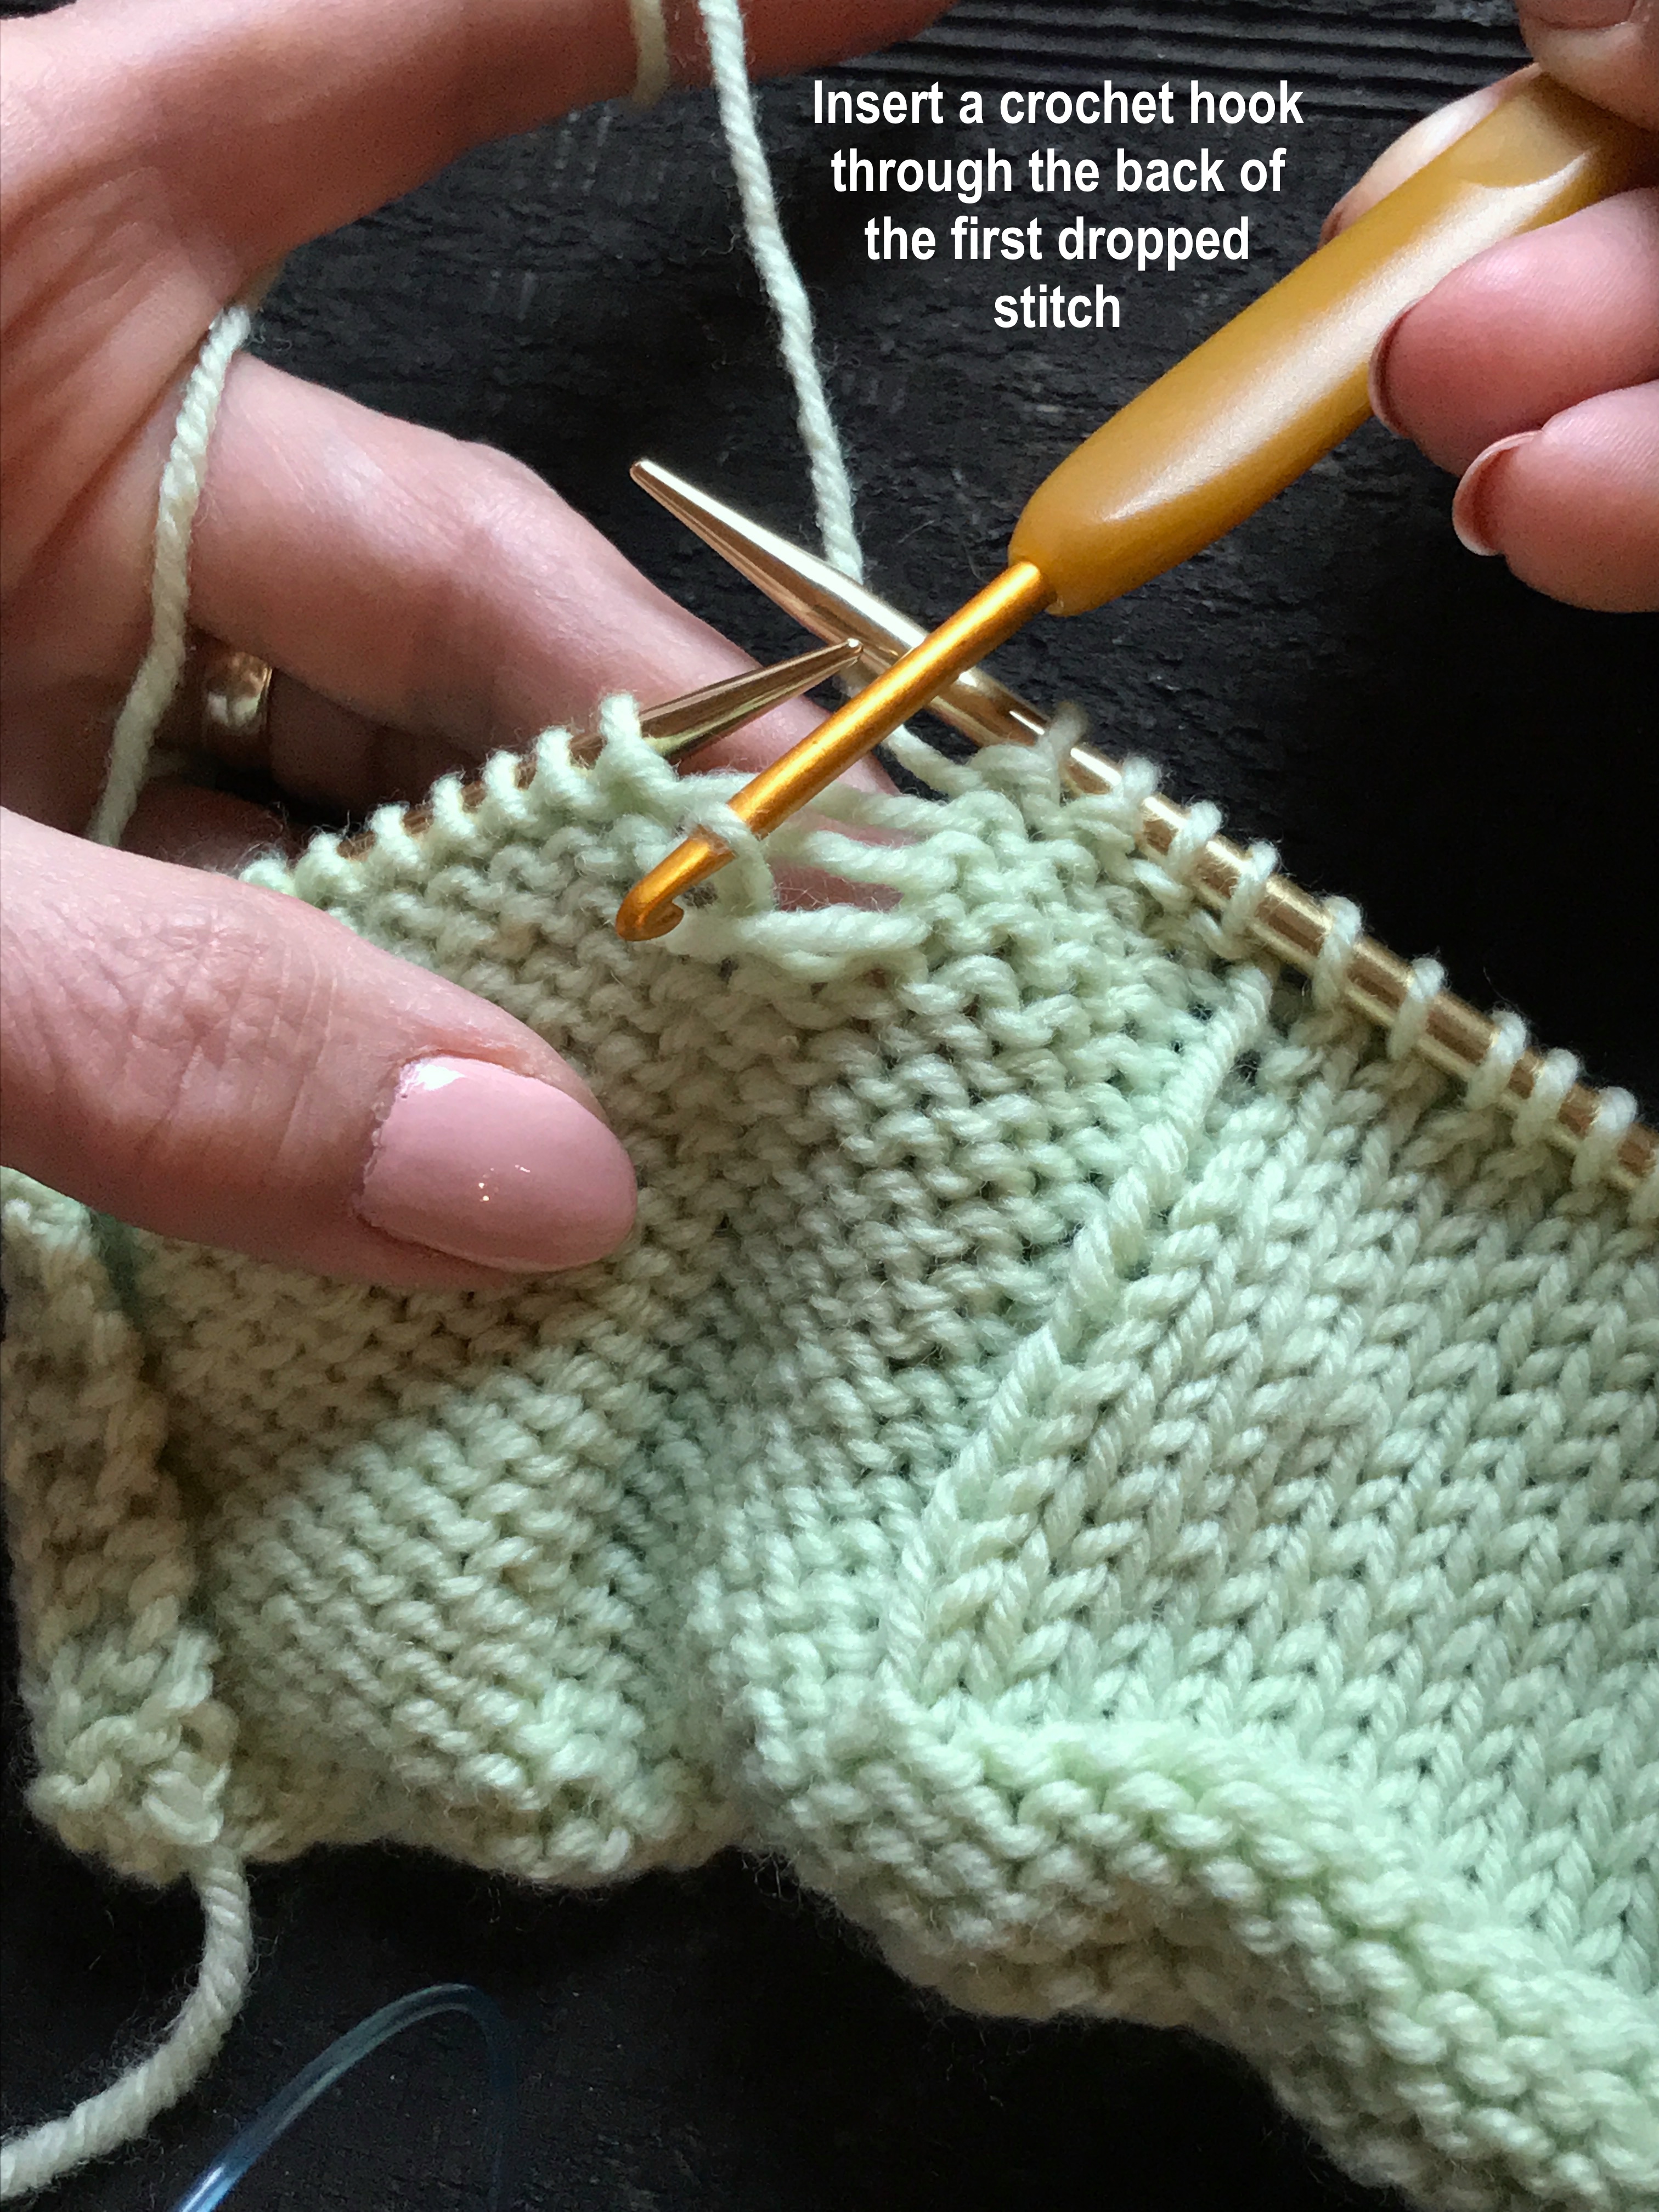
How to Fix Several Rows of Dropped PURL stitches:


I hope this post helps you never to hear dropped stitches!  Refer to video within the post if you need more help.

Happy Knitting!
Elaine

Advertisement
h1

Stretchy Knitted Icelandic Bind Off

December 19, 2016

Icelandic Bind Off.jpg


For most projects, doing a basic bind off is fine, but some projects require a special bind off.  I will never forget a scarf I made many years ago where I did a basic bind off.  To my horror, after the thing was off my needles, I realized that the bind off side had curved.  It also had no give whatsoever and the bind off really ruined the finished piece.  Ever since then, I’ve learned to do stretchy bind offs when needed.

My favorite stretchy bind off is this simple one that uses a tapestry needle from Elizabeth Zimmerman.  But this bind off would not work with my Capella Shawl project, because the bind off edge was just too lengthy and it would not have been practical to use a tapestry needle and such an enormous length of yarn.  So it was the Icelandic Bind Off to the rescue.  This is a stretchy bind off that is perfect for a garter stitch edge and it is done right on the needles.  It’s simple once you do a few of the stitches.  I have step by step photos, followed by a video if that helps you more.

(Scroll to the bottom of this post for the video).

icelandic-bindoff-1icelandic-bindoff-2icelandic-bindoff-3icelandic-bindoff-4icelandic-bindoff-5icelandic-bindoff-6


h1

Magic Loop Tutorial

January 23, 2016

paperdoll gloves magic loop

I have had several requests lately for help in using the Magic Loop method for knitting in the round.  It can be a little daunting to learn.  Since I use Magic Loop so much, I want to help spread the love!  So I made a video (at bottom of post). I hope this video explains things in a way that makes it easier for you to understand, if you are struggling with it.

After you have knit with the method for a while, it becomes super easy.  Some people think Magic Loop involves a lot of fiddling with pulling the needles, etc., but I can knit very fast this way and it becomes second nature.

chinook on magic loop

With Magic Loop, you can try your work on for size!  Try doing that with DPNs – doesn’t work so well


There are some reasons I love Magic Loop so much for knitting things in the round:

  1. No DPN (double point needle) tips sticking out! I hate working around those.
  2. Your work isn’t in danger of falling off when you have it on the circular cable (shown on video).  When I put my knitting down, I just slip the work from the needles onto the cable and it’s safe as can be.
  3. If you’re knitting something like a mitten in the round, you can actually slip your work from the needles onto the cable and try the mitten on for size! A big plus.
  4. Makes it super simple to knit something tiny like a thumb or finger.  If you use DPNs, you have to get teeny tiny DPNs to do this and it’s a hassle.
  5. Even if I have a very long circular needle, I can knit a variety of sizes on it, because the cable part just dangles.


chinookfinger

In this video, I’m using 32″ circular needles, which is a great average size for a variety of different projects.  My favorite circular needles are always Addi Lace. They are super smooth and super sharp, resulting in work that just glides along and needle points that are inserting easily for knitting.

One thing I failed to mention in the video (sorry!) is a helpful little tip:  After you get your project going, the dangling tail yarn becomes your “marker” for the beginning of your work and to tell you where the right side of the work is. This is helpful in case you forget if you have knit half of the round or all of the round – if the tail yarn is dangling on the right, you have completed a round.  Sometimes if you are knitting a project that is just a single solid color, you can get mixed up.

tail end on the left:  you are in the middle of a row.
tail end on the right:   you are at the beginning of a row.


If you have any questions, feel free to ask in the comment section or email me. Good luck and enjoy Magic Loop!

Elaine


h1

Sideways Garter Stitch Vest

March 28, 2015

gartervestblackontop

this vest is vertically reversible!

gartervestgreyontop

If you do not subscribe to Purl Soho’s e-mail newsletter, you really should.  This great little shop in New York’s Soho neighborhood puts out an awesome mailing that includes free patterns.  That is where I saw this pattern for a vest that is done entirely in garter stitch.  It caught my eye right away, so I looked it up on Ravelry to see how  many people were knitting it and what their creative spins on it might be. One great feature of this vest is that you can turn it upside down and wear it the other way, with the contrasting color on top.  Each way gives you a different size collar.

gartervestonneedles

This was such an easy project to knit – it’s just one big rectangle of garter stitch -but it does require doing afterthought armholes, which I kind of love doing.  I’ve done a lot of afterthought thumbs for mittens and afterthought heels for socks, so I know the technique well.

You just knit a length of contrasting waste yarn across the required number of stitches, slip these stitches back to the left needle and knit in your regular yarn.  This leaves you with this contrasting yarn embedded into your piece:

gartervestafterthoughtarmholes

To make the armholes, you slip your stitches just under your waste yarn, picking up one leg from each stitch underneath:

pickingupstitchesgartervest

Here are the stitches on the needles after they are all picked up, both below and above the waste yarn:

afterthoughtarmhole

Now you can get rid of the waste yarn by just picking it out and cutting it as you go to remove it:

pickingoutstitchesforvest

Now it’s a matter of just binding off those stitches you just picked up:

bindingoffafterthought

After they are all bound off, behold – an armhole:

gartervestarmhole

It’s really pretty easy.  A lot of people on Ravelry decided not to do Afterthought Armholes and, instead, just bound off the stitches as they knitted the garment but as I understand it, this method does not make as nice an armhole.  I guess the tension can vary too much.

gartervestside

I really love this vest.  It turned out with a very nice drape – I used a Made in Michigan yarn called Shepherd’s wool that I really love.

Pattern:  Sideways Garter Vest
Needles:  US # 8 Addi Lace 40″ circulars
Yarn: Shepherd’s Wool in Pewter and Black
Ravelry Page

%d bloggers like this: